A little build.
A little you.

Make your Mini Tumbler, one brick at a time. Start with the pieces, then follow the red arrows.

78 pieces34 steps15.7 cm tall

Instruction preview in pink. Guide colors differ from the shop images; physical assembly has not yet been tested.
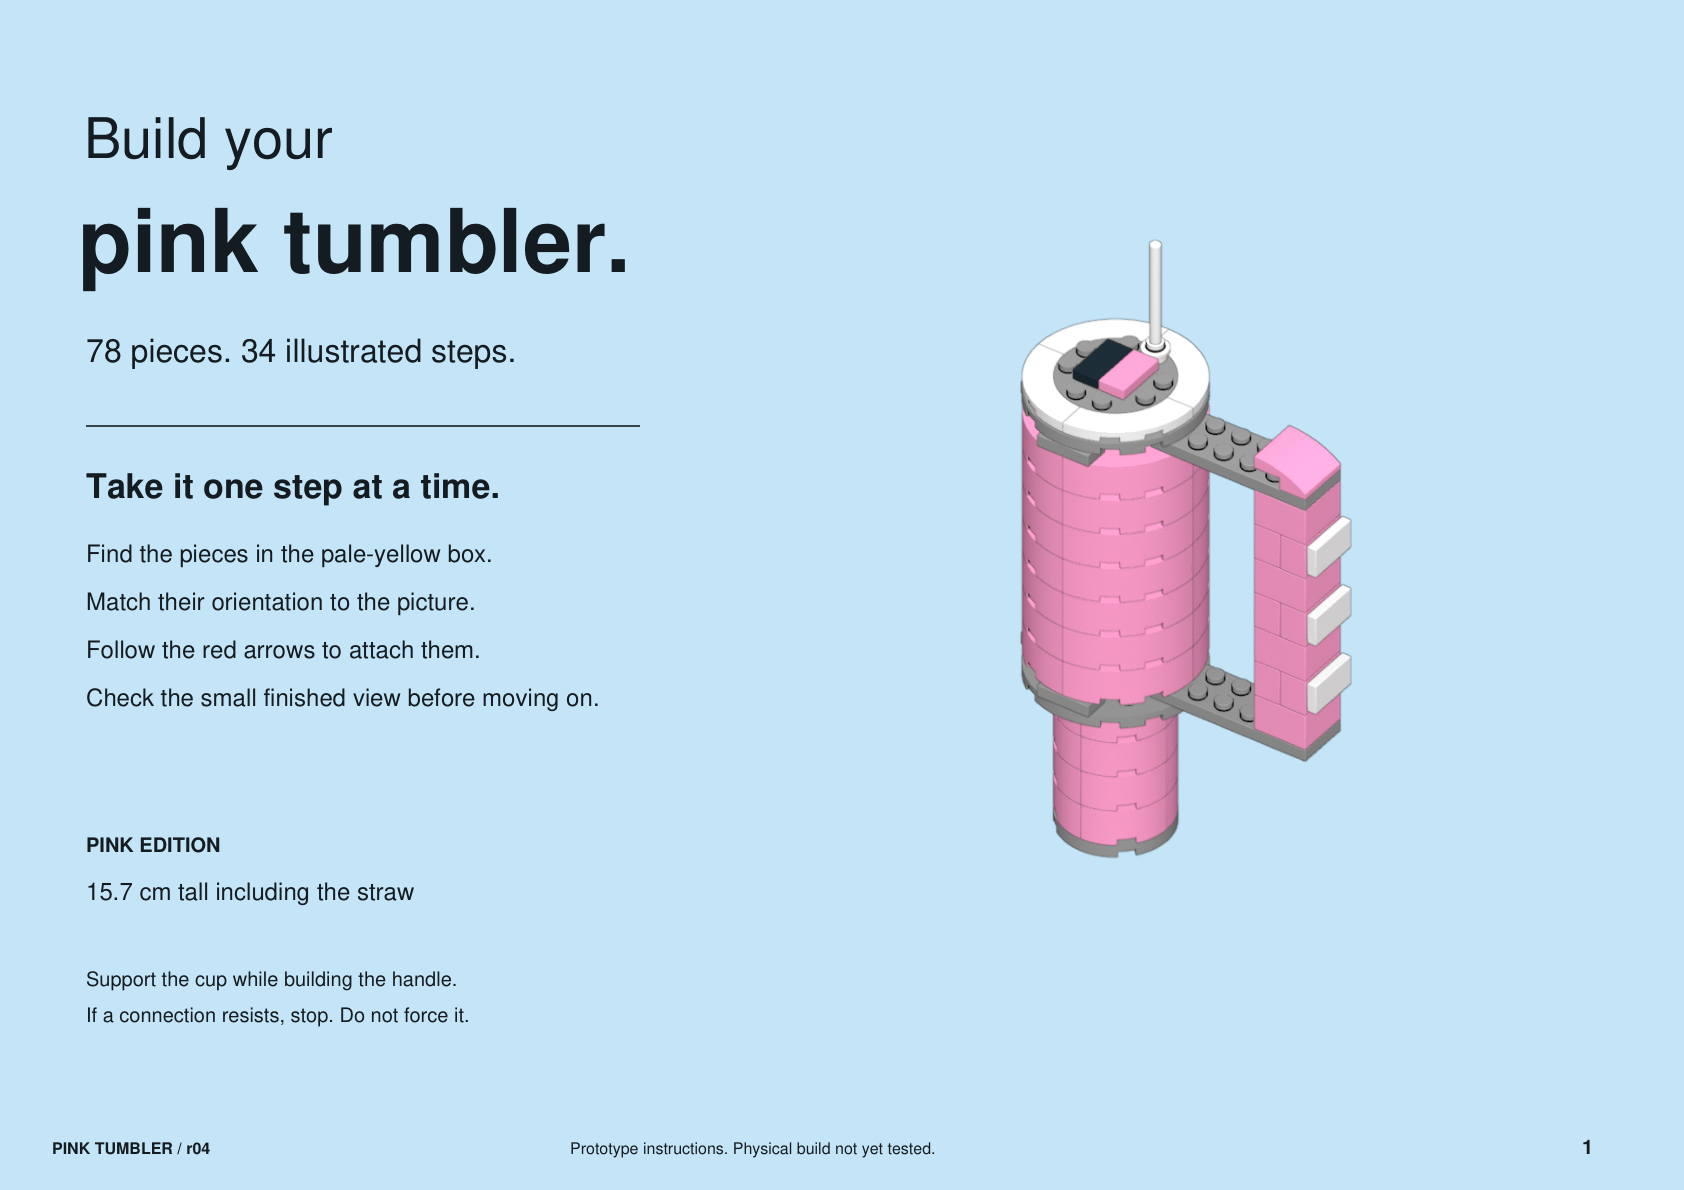
Pink Mini Tumbler illustrated booklet cover, with guidance on matching the pieces and following placement arrows.
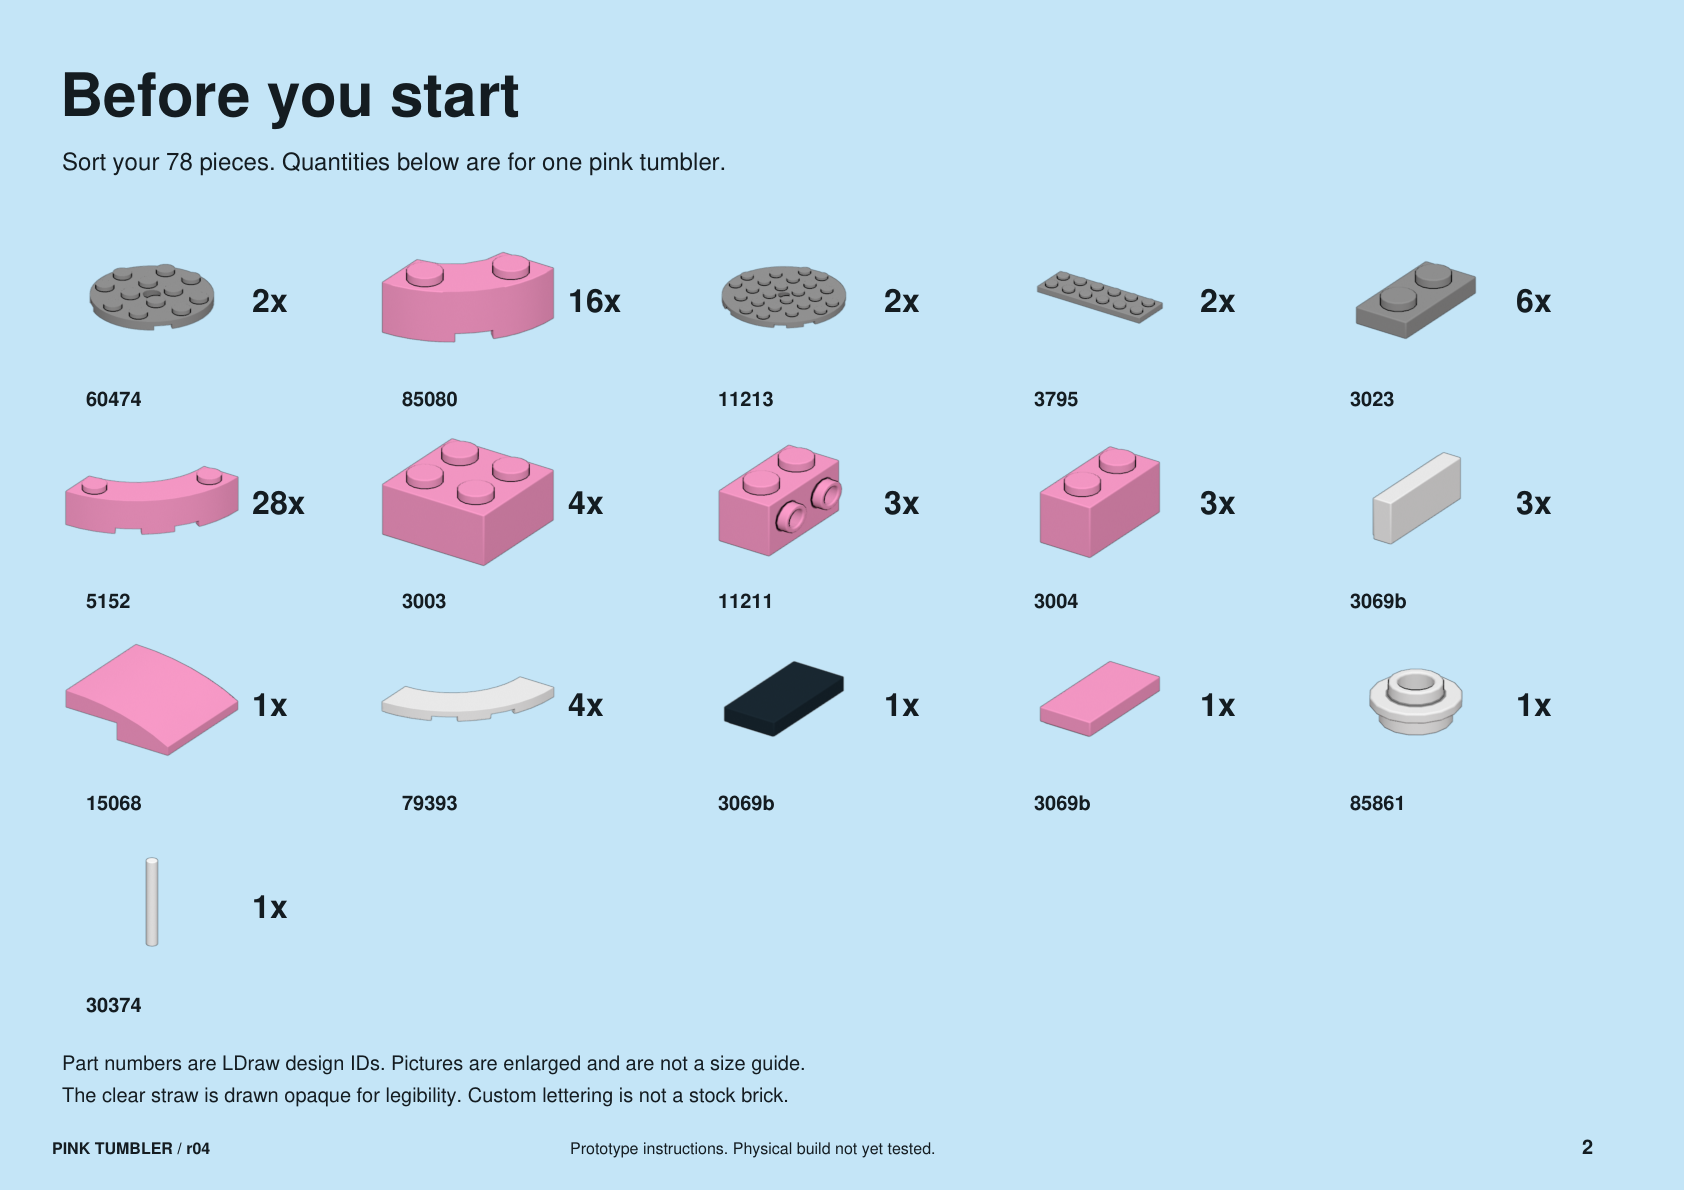
Before you begin: find your 78 piecesIllustrated inventory of all 78 pieces

Download the parts list. The clear straw is drawn opaque so you can see its edges.

Step 1: Start with the base
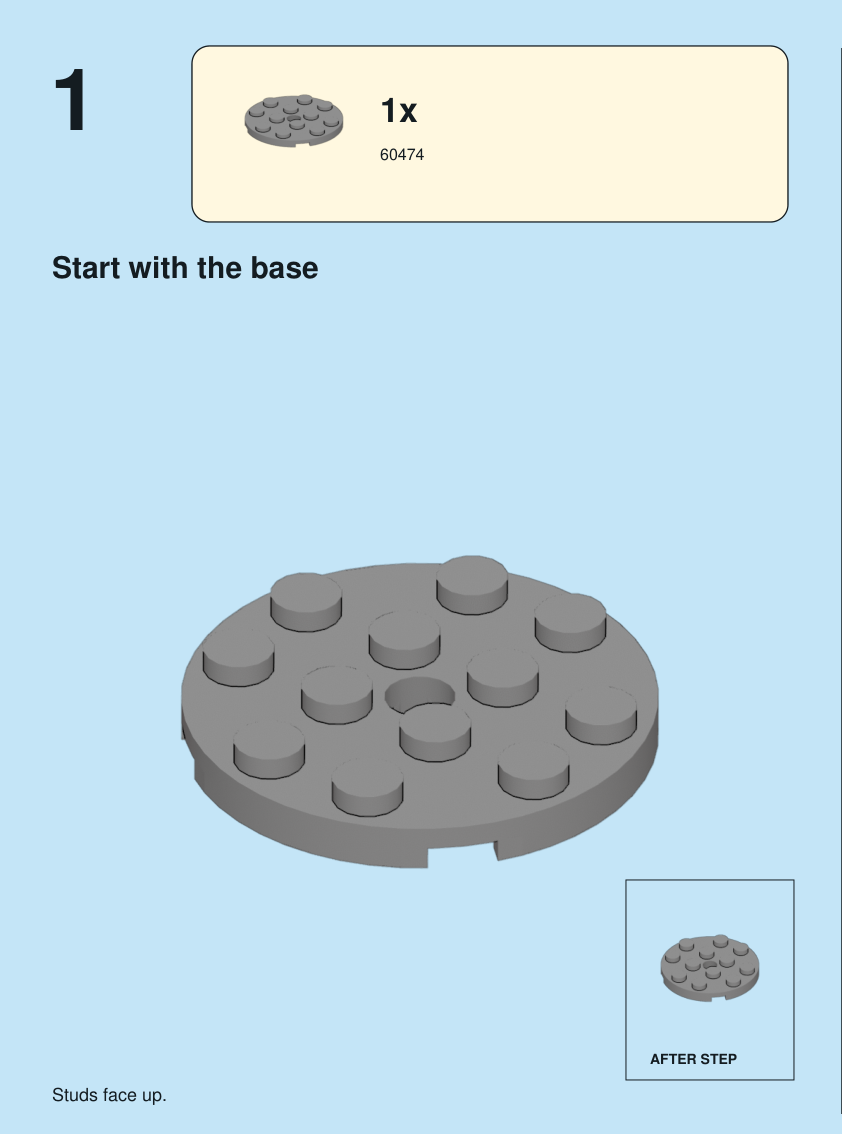
Step 1. Start with the base. Studs face up. Pieces: 1 x part 60474, color 71.

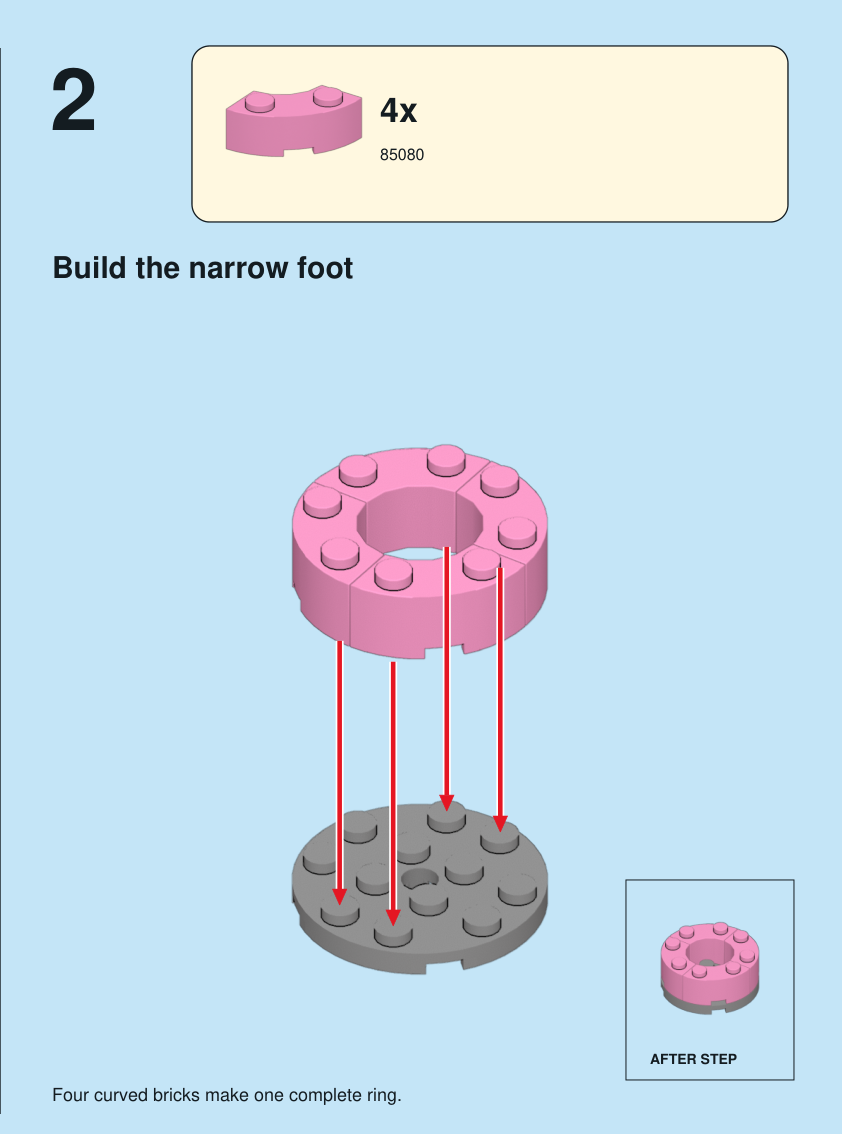
Step 2: Build the narrow foot

Step 2. Build the narrow foot. Four curved bricks make one complete ring. Pieces: 4 x part 85080, color 29.

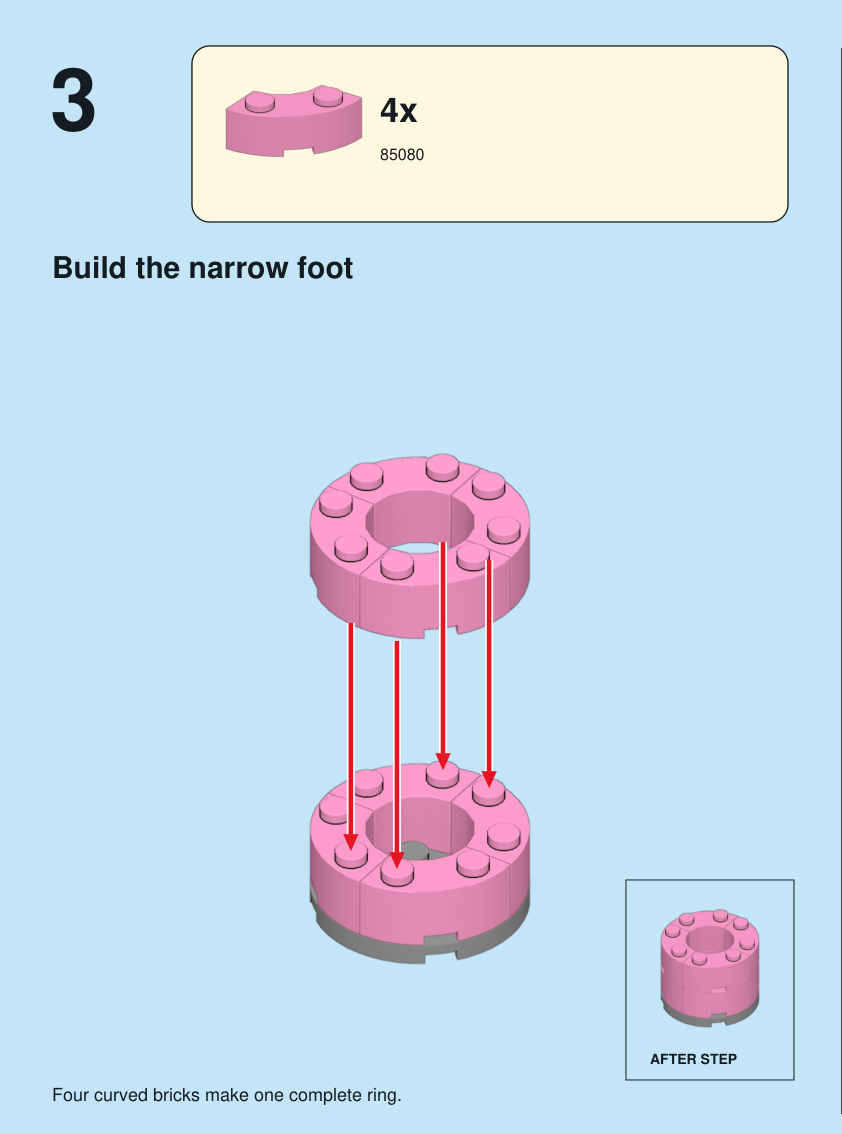
Step 3: Build the narrow foot

Step 3. Build the narrow foot. Four curved bricks make one complete ring. Pieces: 4 x part 85080, color 29.

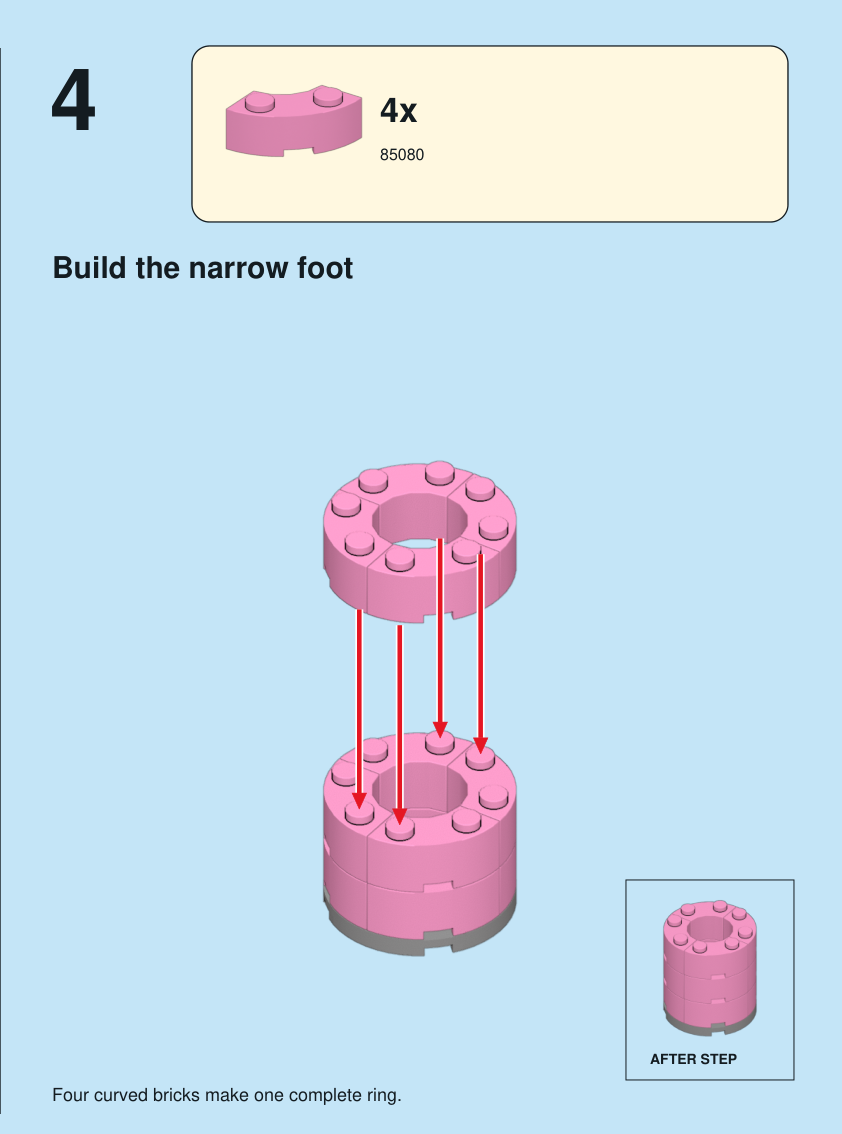
Step 4: Build the narrow foot

Step 4. Build the narrow foot. Four curved bricks make one complete ring. Pieces: 4 x part 85080, color 29.

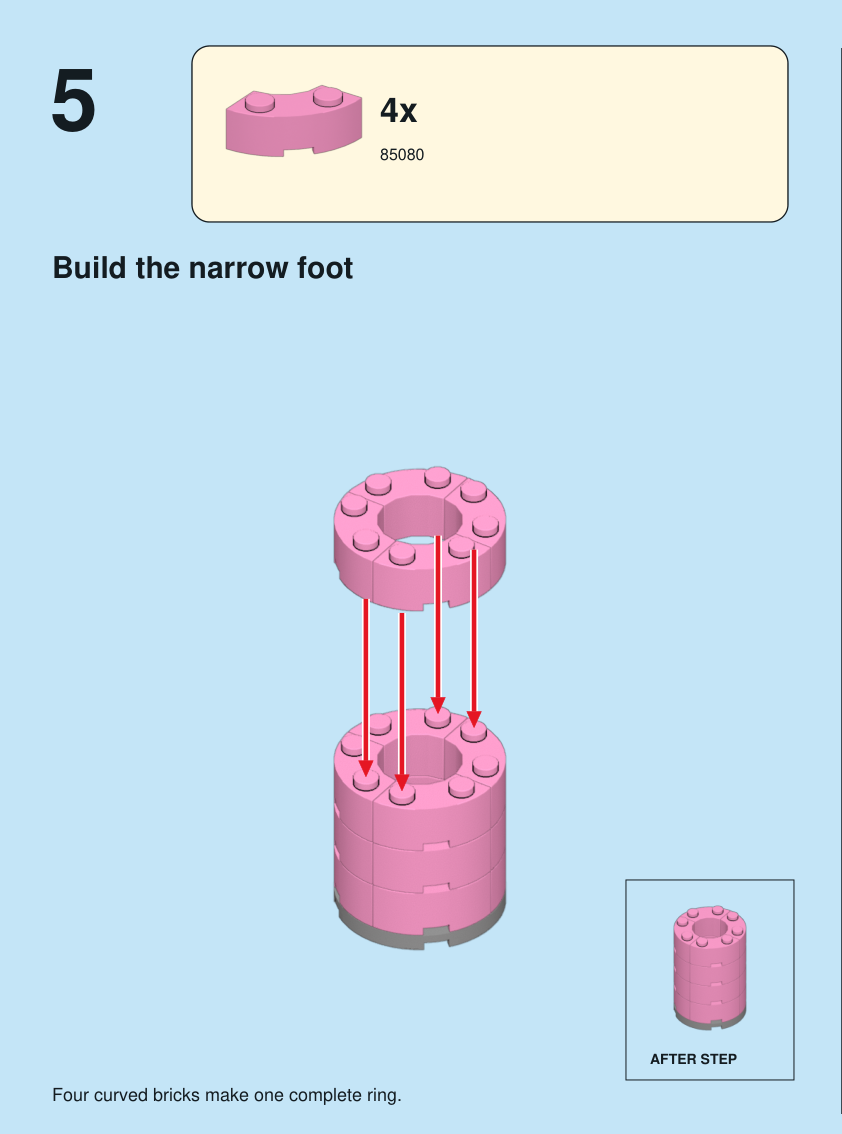
Step 5: Build the narrow foot

Step 5. Build the narrow foot. Four curved bricks make one complete ring. Pieces: 4 x part 85080, color 29.

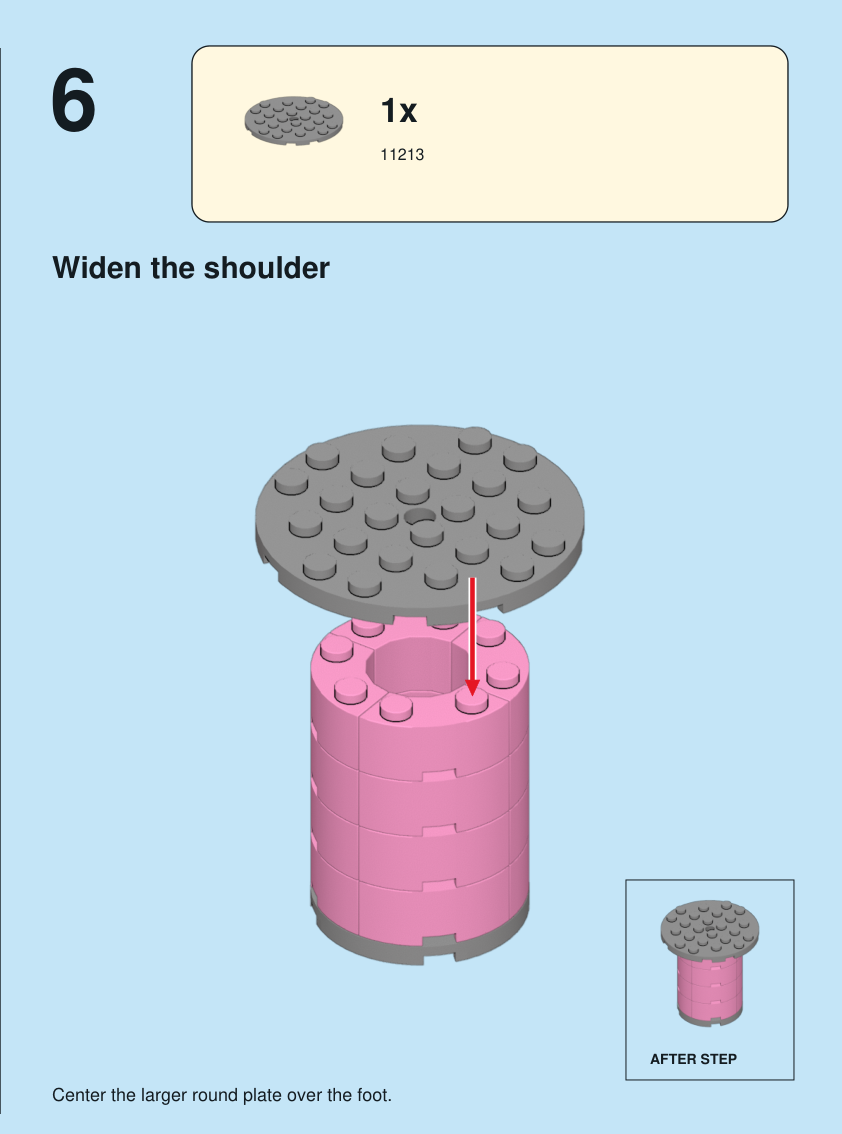
Step 6: Widen the shoulder

Step 6. Widen the shoulder. Center the larger round plate over the foot. Pieces: 1 x part 11213, color 71.

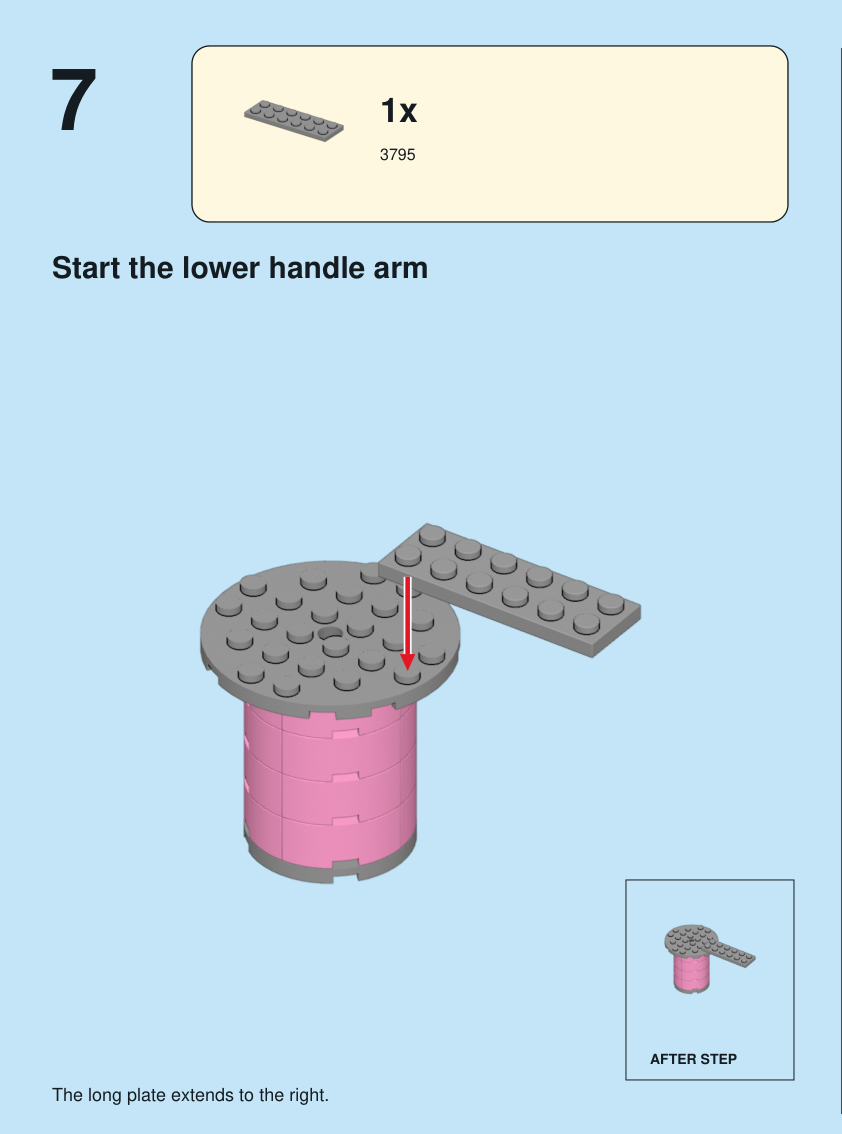
Step 7: Start the lower handle arm

Step 7. Start the lower handle arm. The long plate extends to the right. Pieces: 1 x part 3795, color 71.

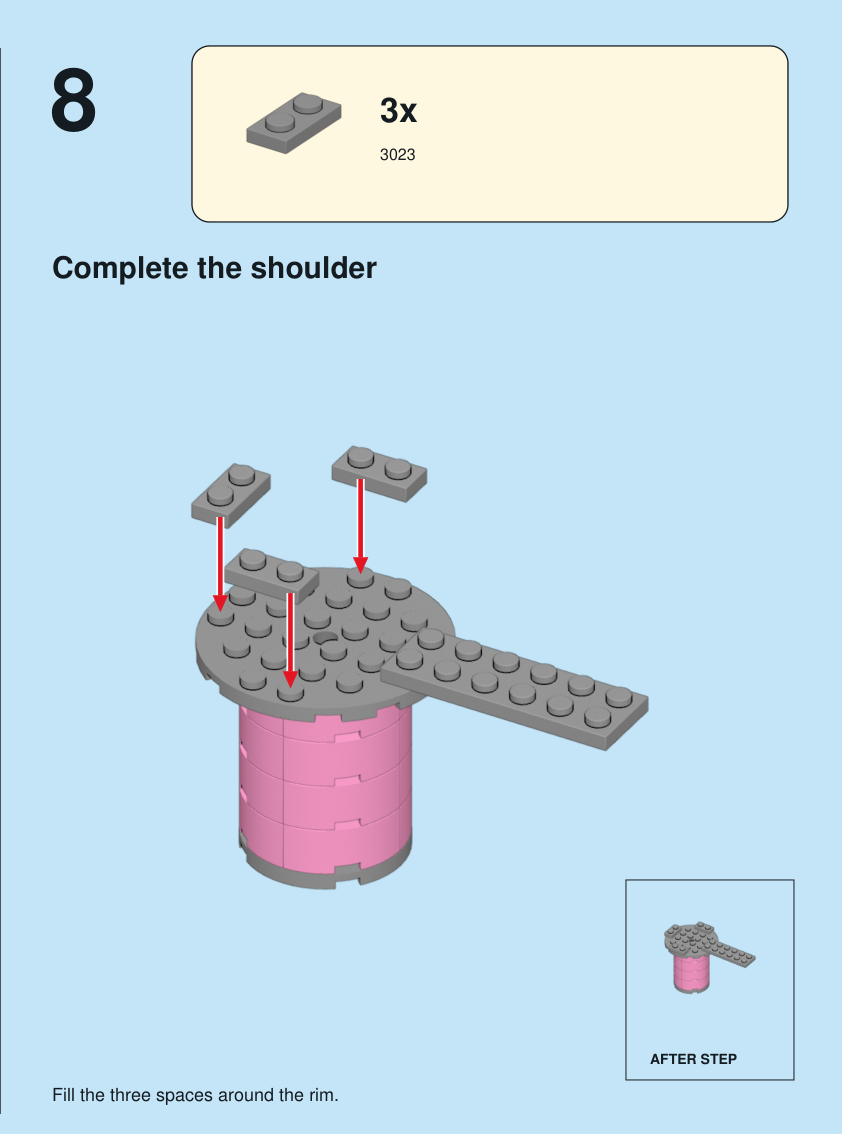
Step 8: Complete the shoulder

Step 8. Complete the shoulder. Fill the three spaces around the rim. Pieces: 3 x part 3023, color 71.

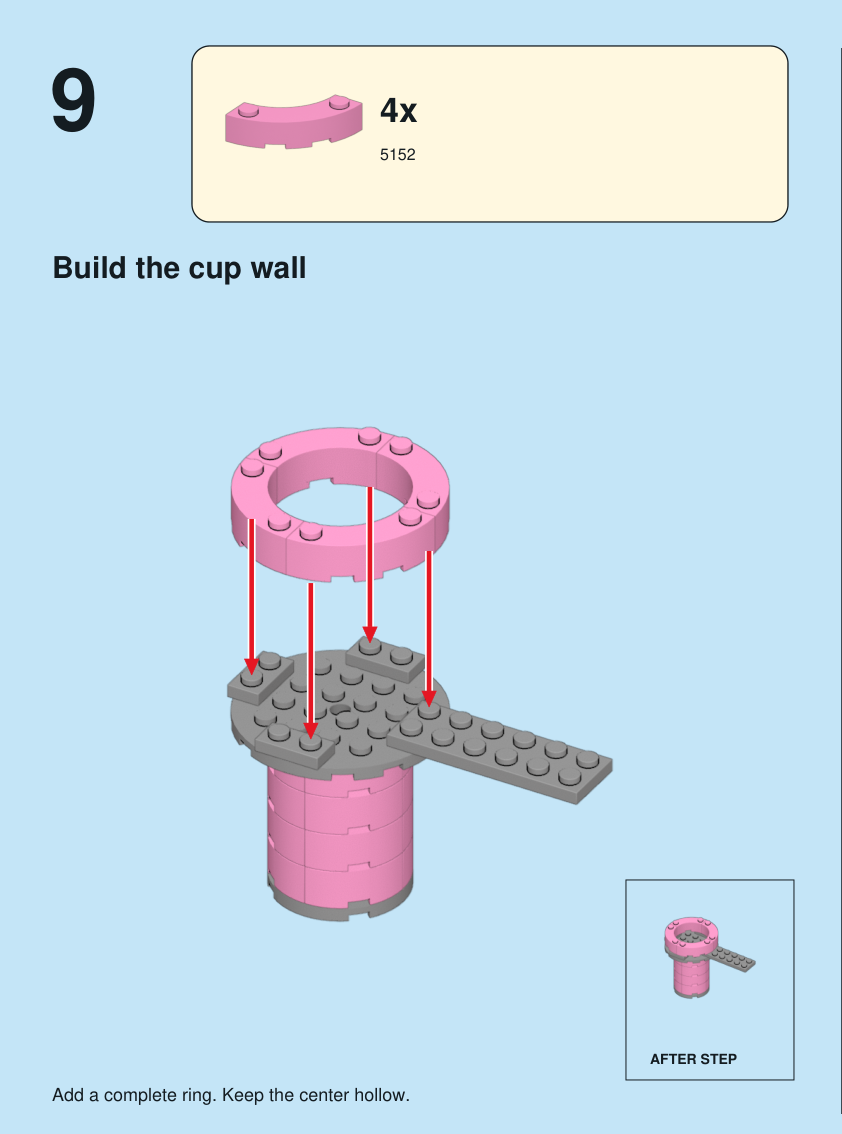
Step 9: Build the cup wall

Step 9. Build the cup wall. Add a complete ring. Keep the center hollow. Pieces: 4 x part 5152, color 29.

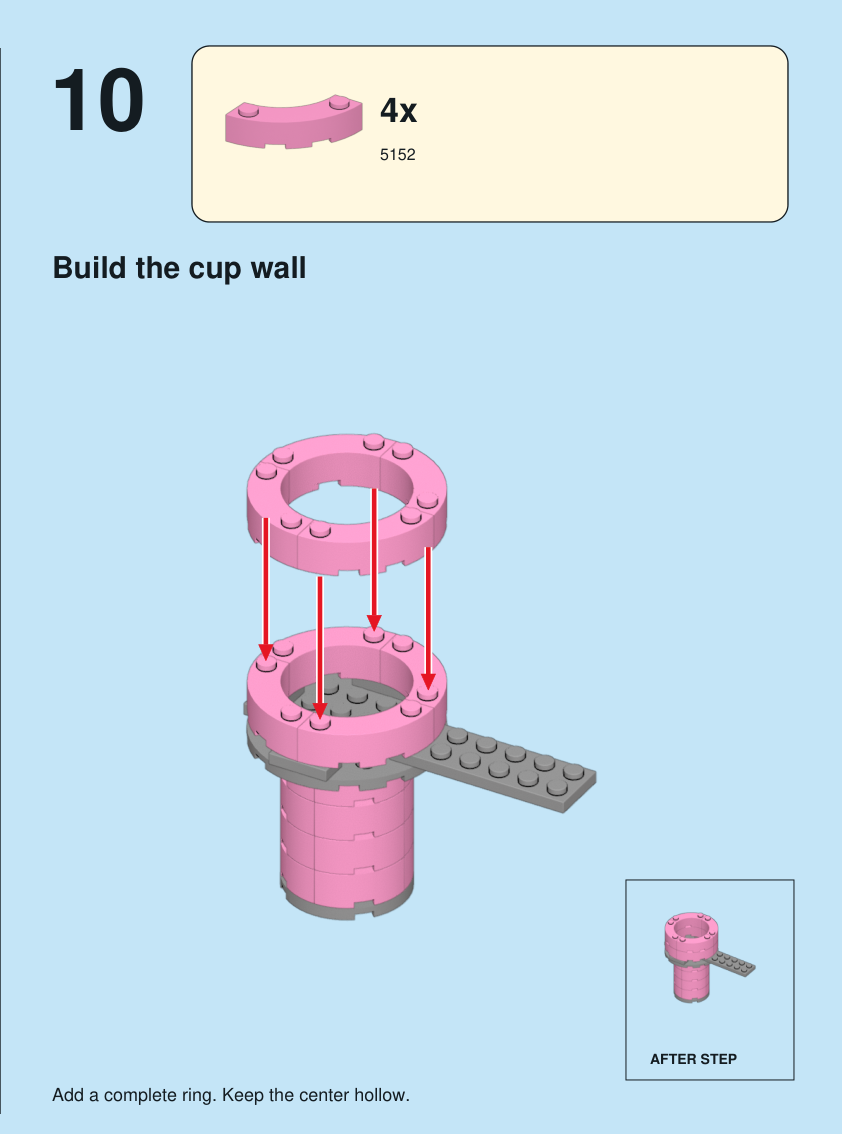
Step 10: Build the cup wall

Step 10. Build the cup wall. Add a complete ring. Keep the center hollow. Pieces: 4 x part 5152, color 29.

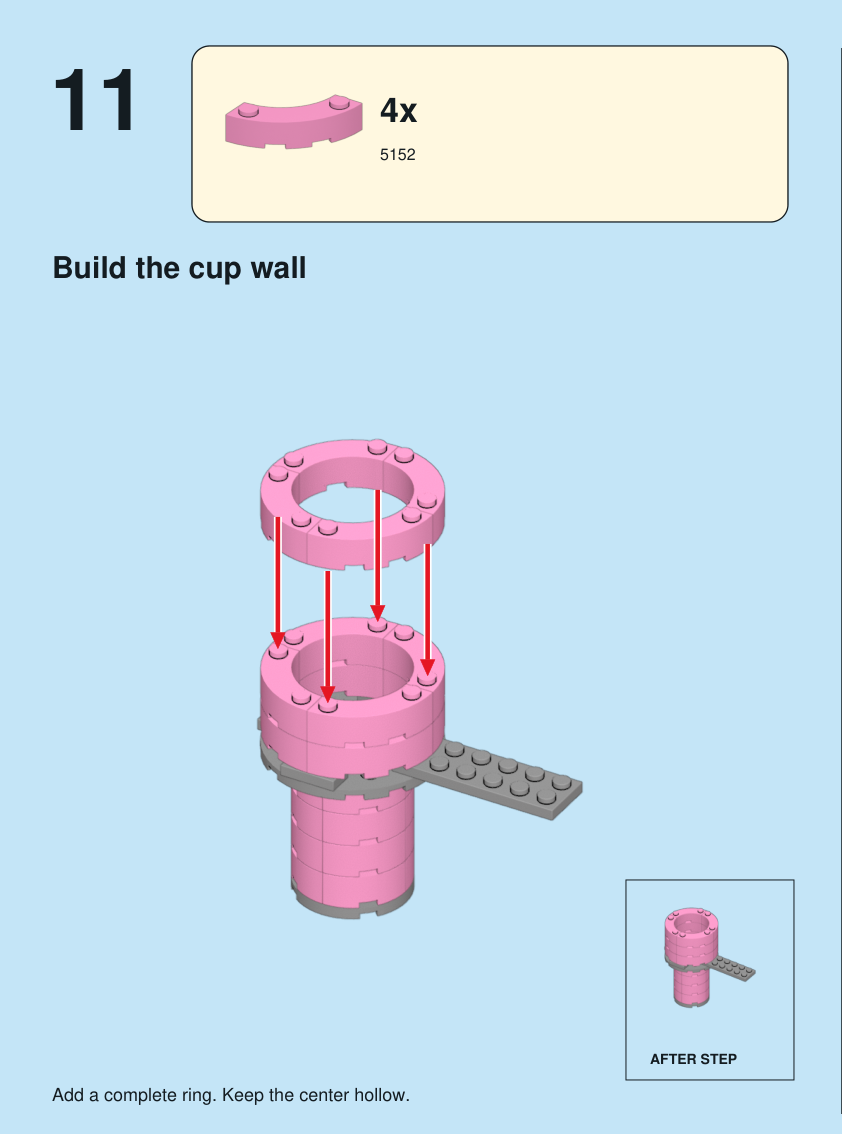
Step 11: Build the cup wall

Step 11. Build the cup wall. Add a complete ring. Keep the center hollow. Pieces: 4 x part 5152, color 29.

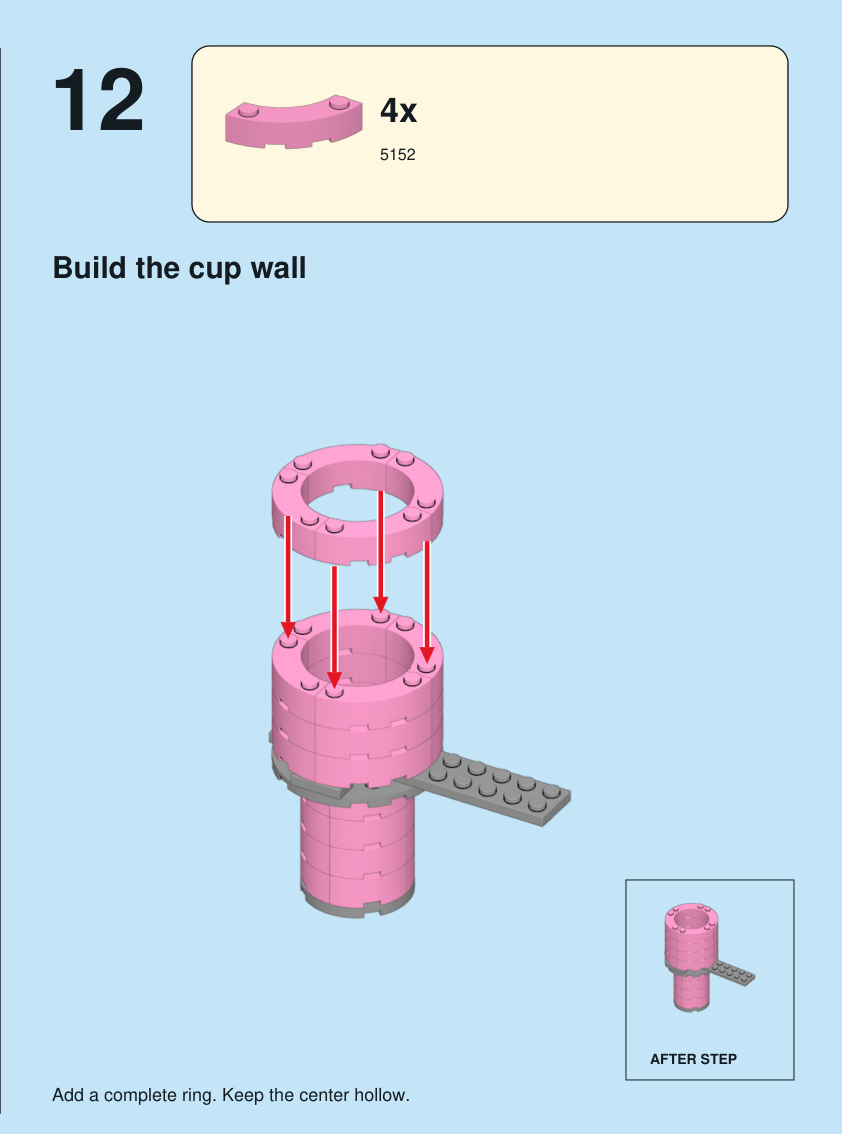
Step 12: Build the cup wall

Step 12. Build the cup wall. Add a complete ring. Keep the center hollow. Pieces: 4 x part 5152, color 29.

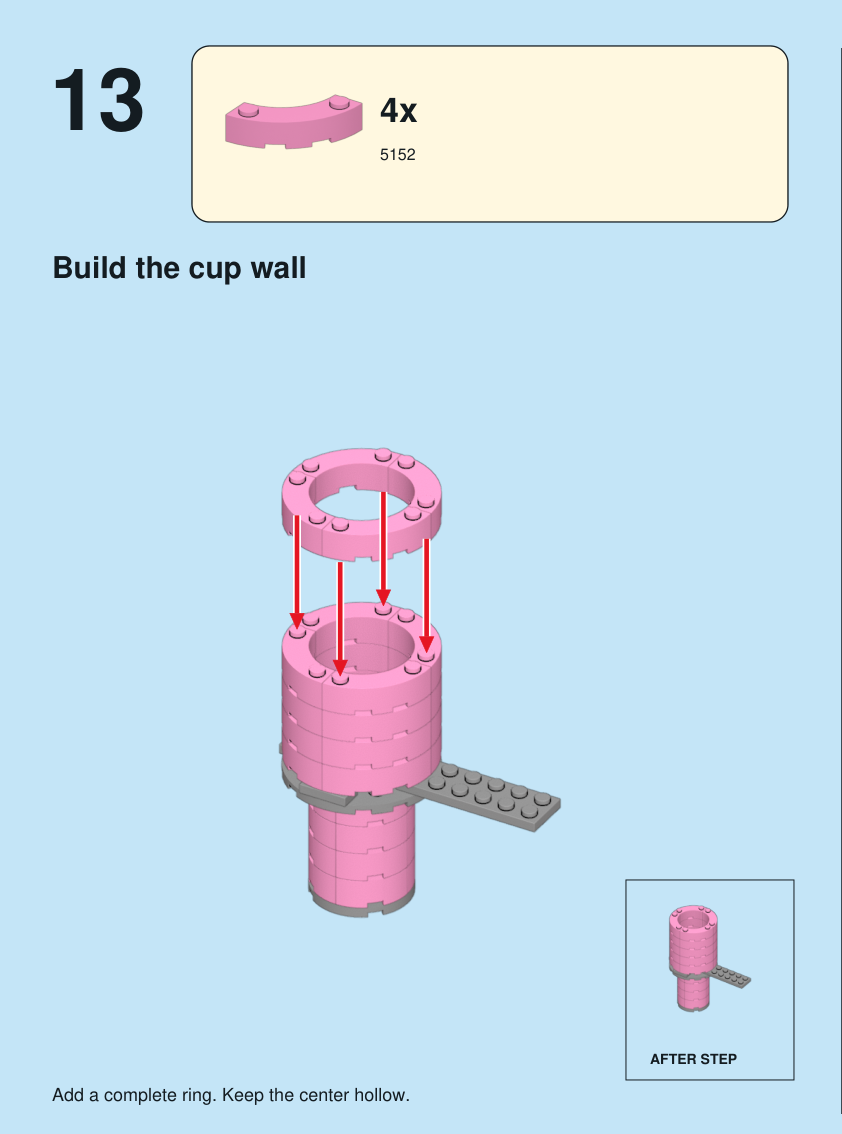
Step 13: Build the cup wall

Step 13. Build the cup wall. Add a complete ring. Keep the center hollow. Pieces: 4 x part 5152, color 29.

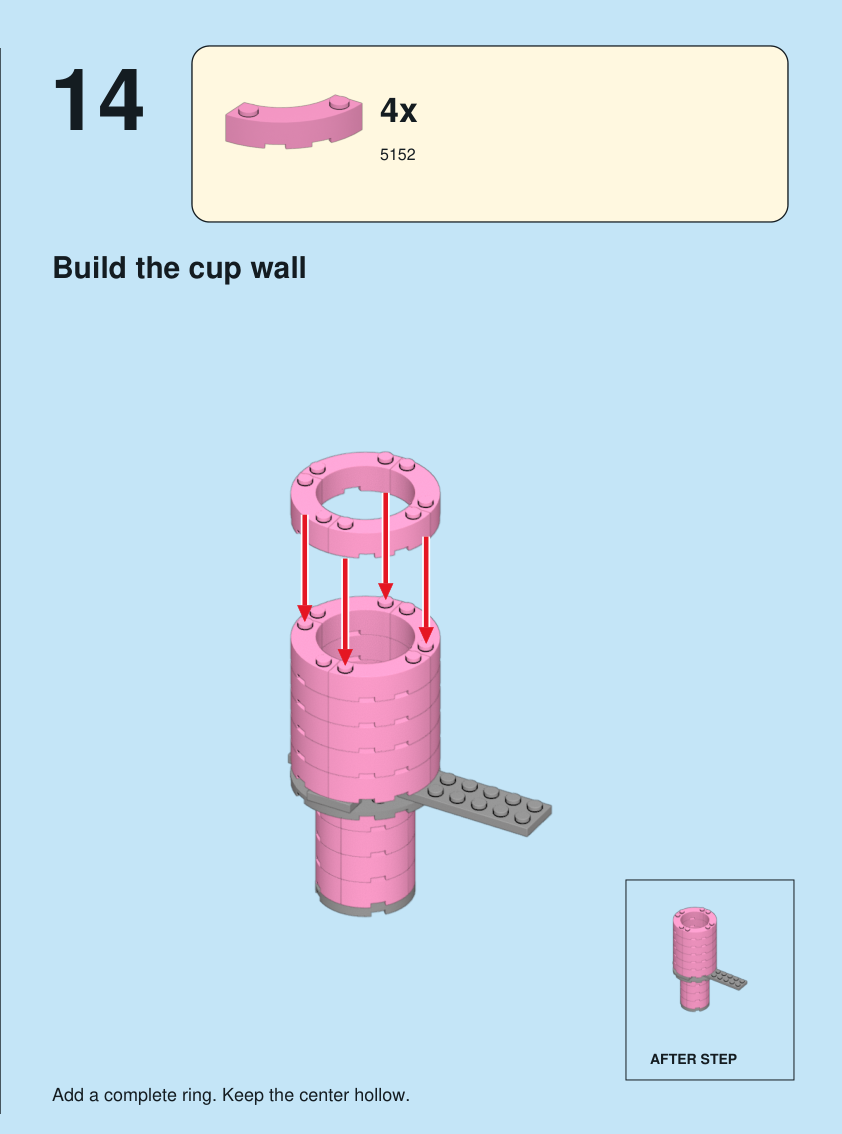
Step 14: Build the cup wall

Step 14. Build the cup wall. Add a complete ring. Keep the center hollow. Pieces: 4 x part 5152, color 29.

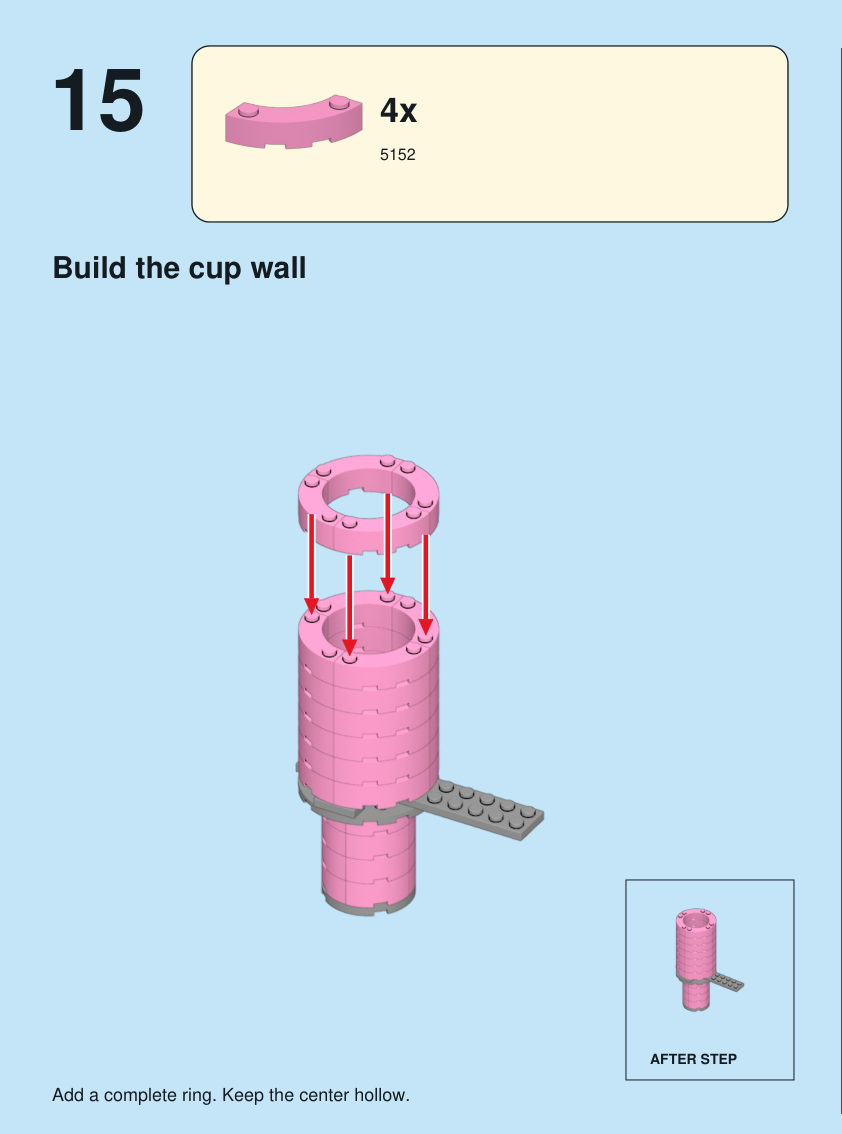
Step 15: Build the cup wall

Step 15. Build the cup wall. Add a complete ring. Keep the center hollow. Pieces: 4 x part 5152, color 29.

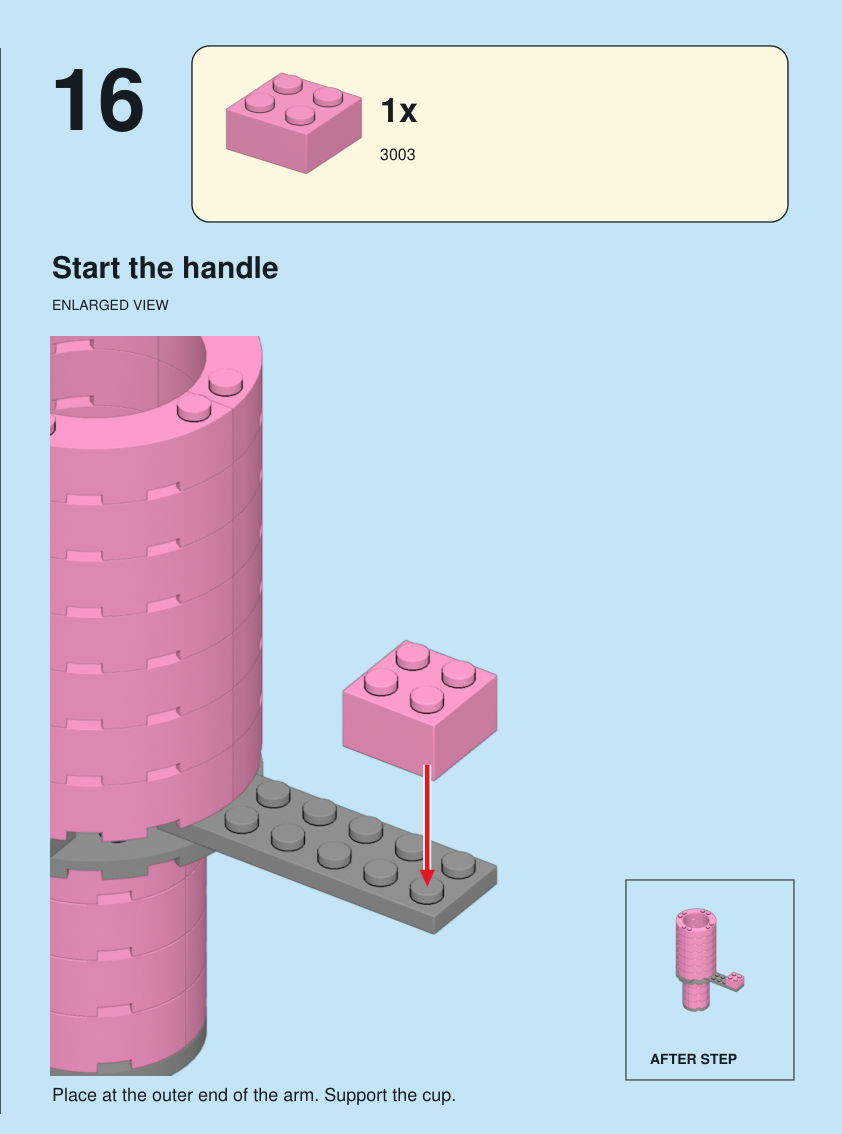
Step 16: Start the handle

Step 16. Start the handle. Place at the outer end of the arm. Support the cup. Pieces: 1 x part 3003, color 29.

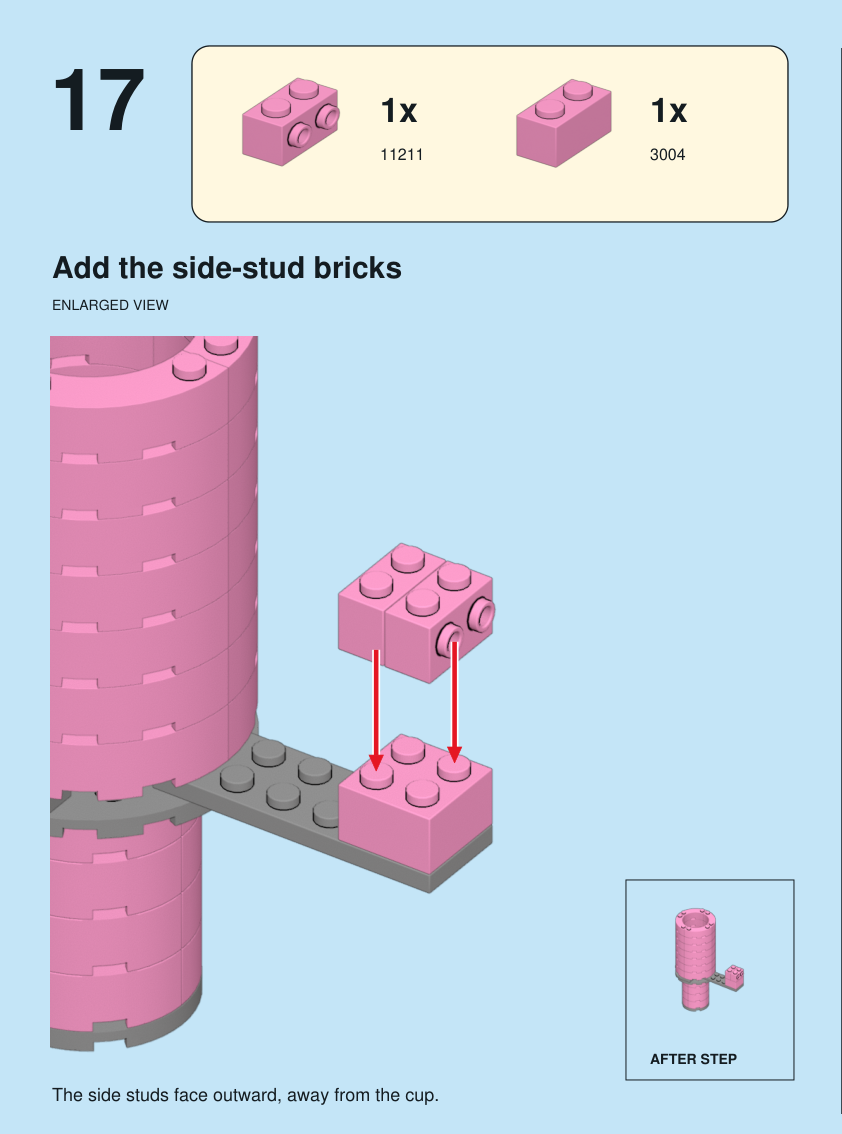
Step 17: Add the side-stud bricks

Step 17. Add the side-stud bricks. The side studs face outward, away from the cup. Pieces: 1 x part 11211, color 29; 1 x part 3004, color 29.

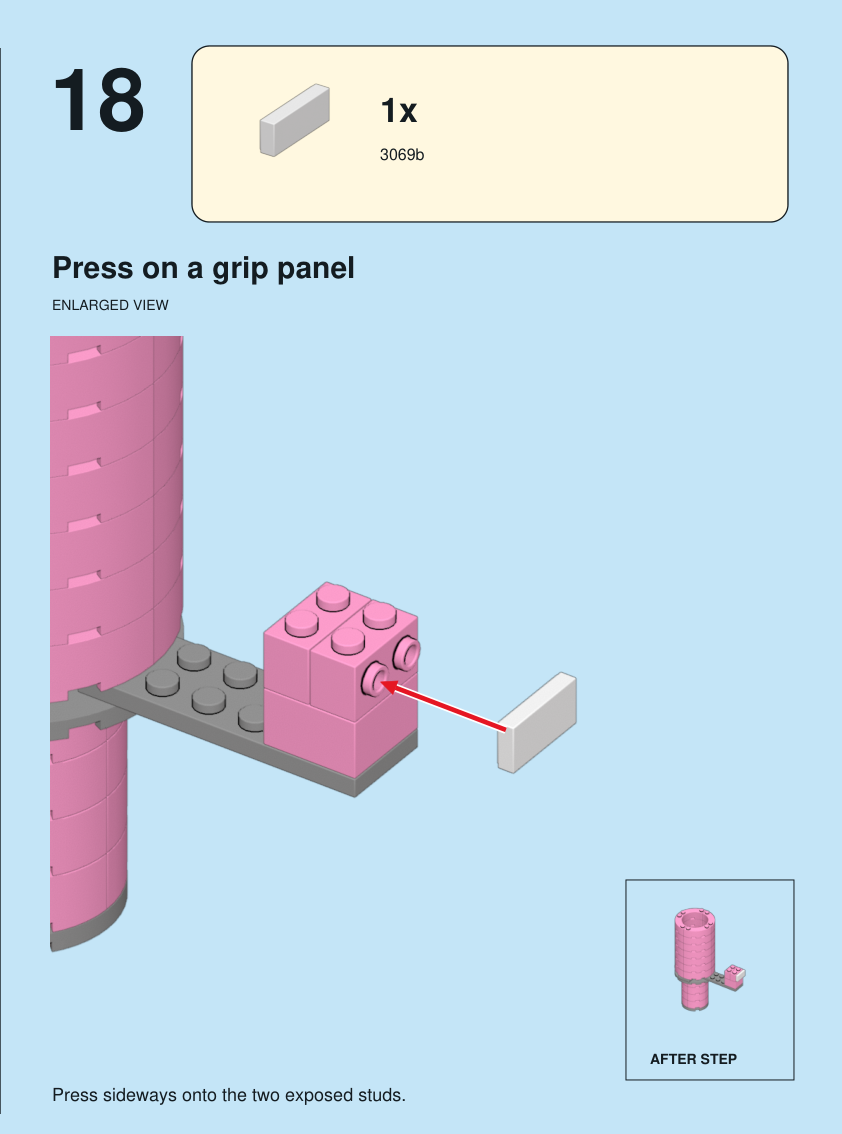
Step 18: Press on a grip panel

Step 18. Press on a grip panel. Press sideways onto the two exposed studs. Pieces: 1 x part 3069b, color 15.

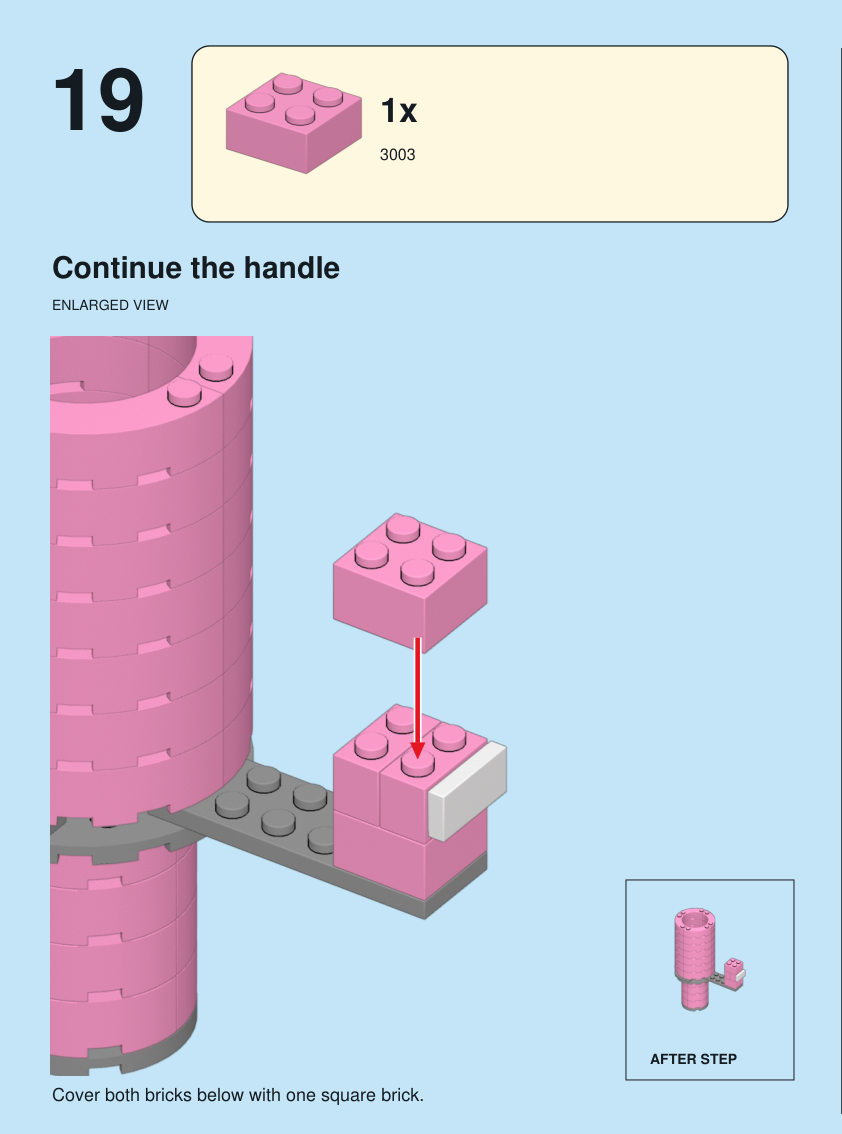
Step 19: Continue the handle

Step 19. Continue the handle. Cover both bricks below with one square brick. Pieces: 1 x part 3003, color 29.

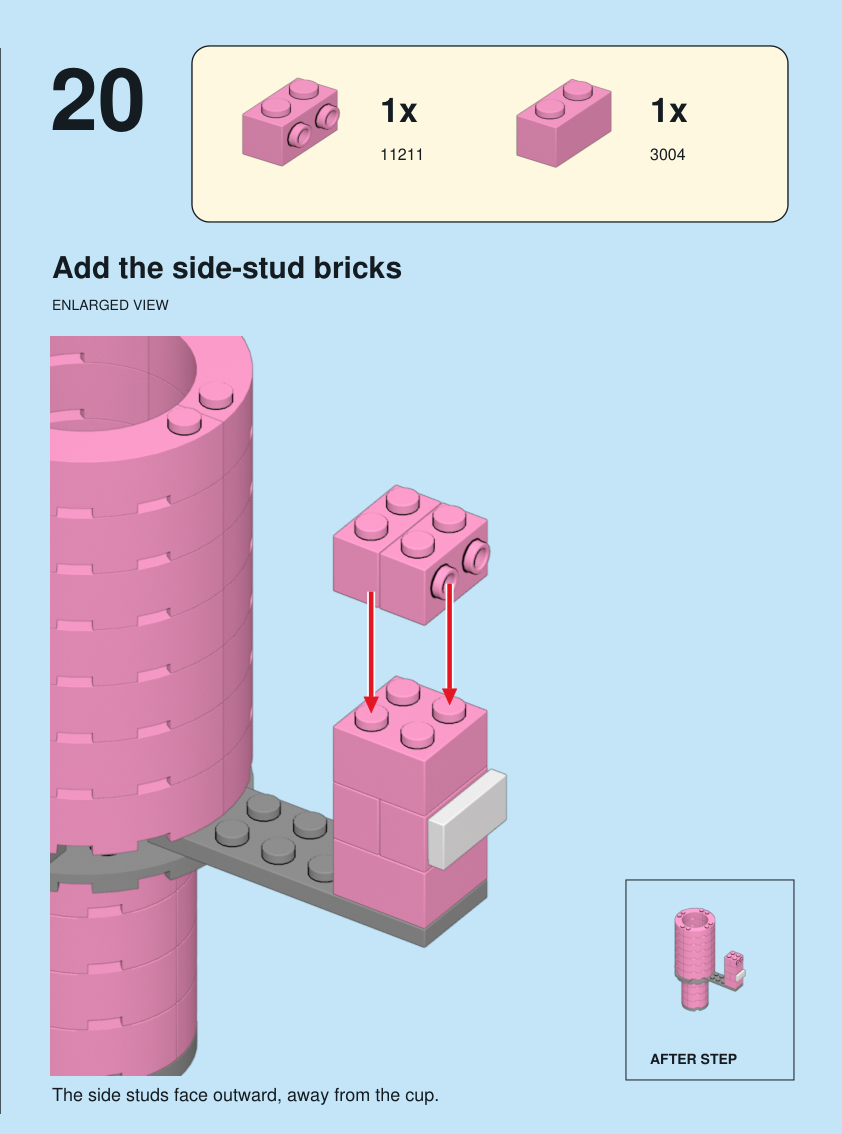
Step 20: Add the side-stud bricks

Step 20. Add the side-stud bricks. The side studs face outward, away from the cup. Pieces: 1 x part 11211, color 29; 1 x part 3004, color 29.

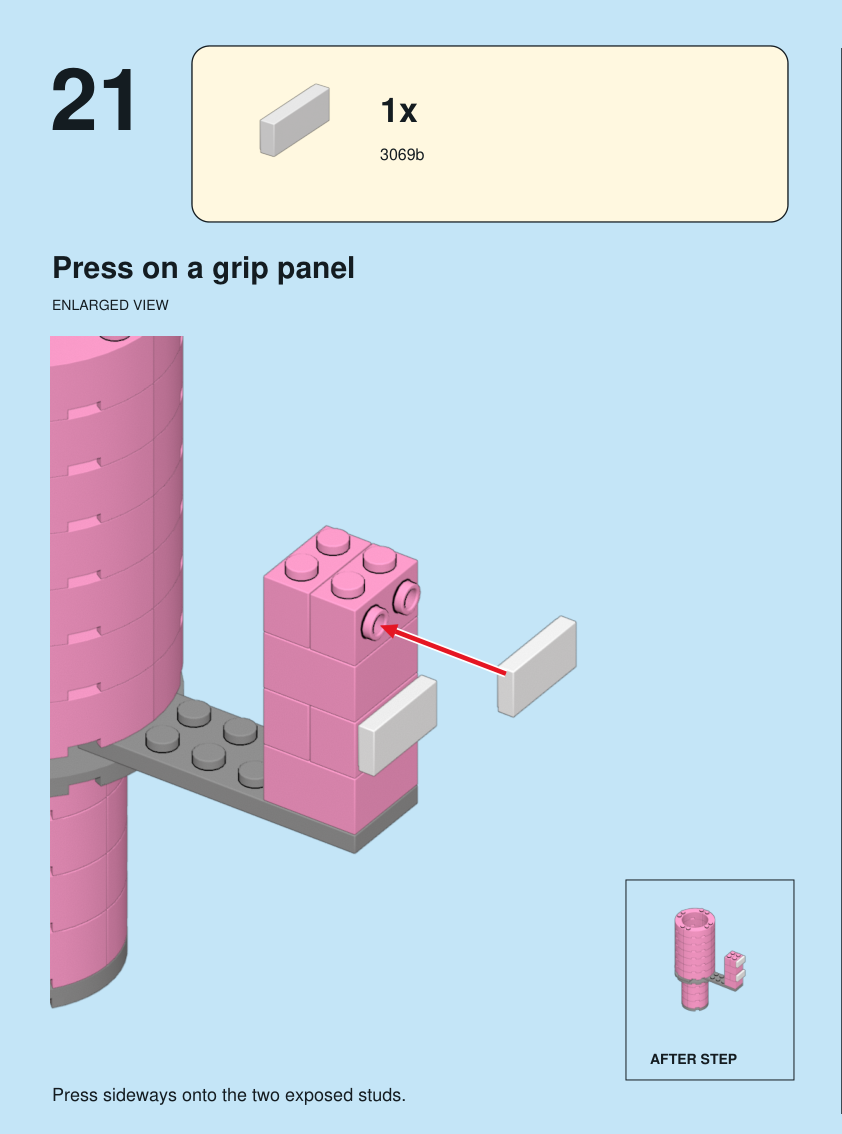
Step 21: Press on a grip panel

Step 21. Press on a grip panel. Press sideways onto the two exposed studs. Pieces: 1 x part 3069b, color 15.

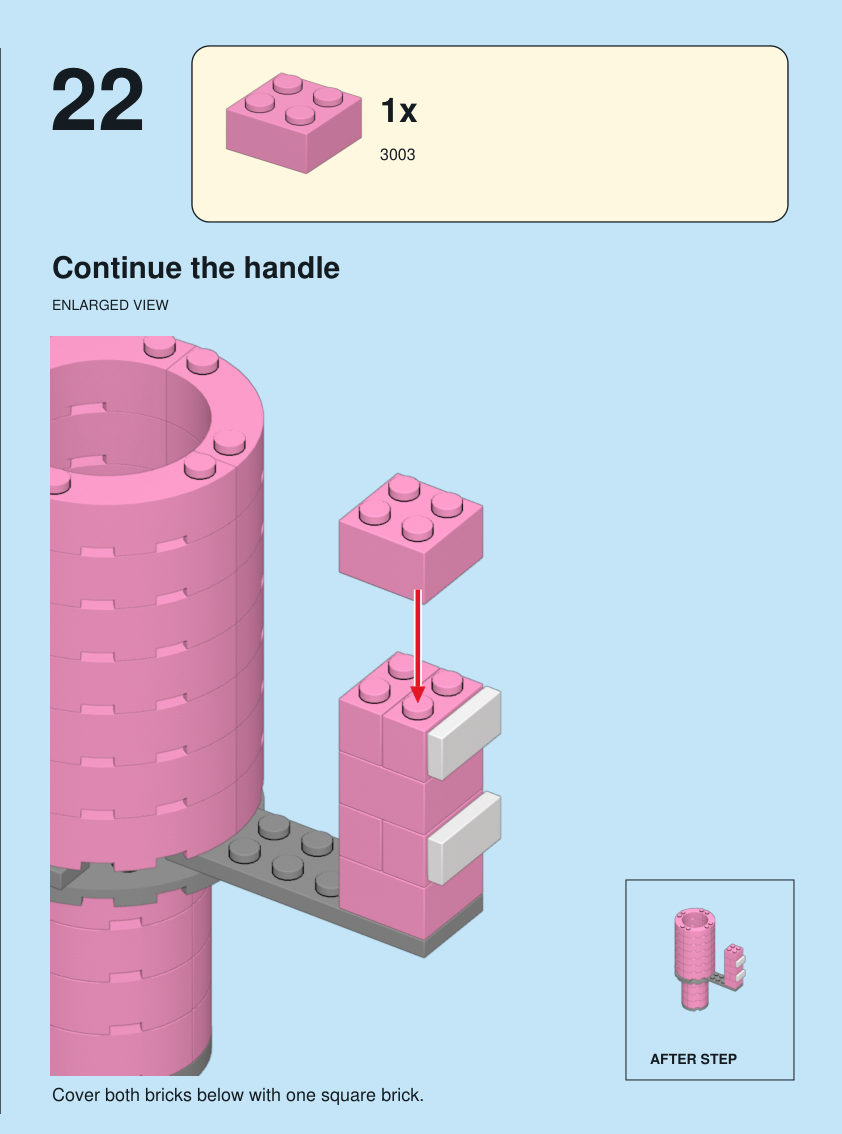
Step 22: Continue the handle

Step 22. Continue the handle. Cover both bricks below with one square brick. Pieces: 1 x part 3003, color 29.

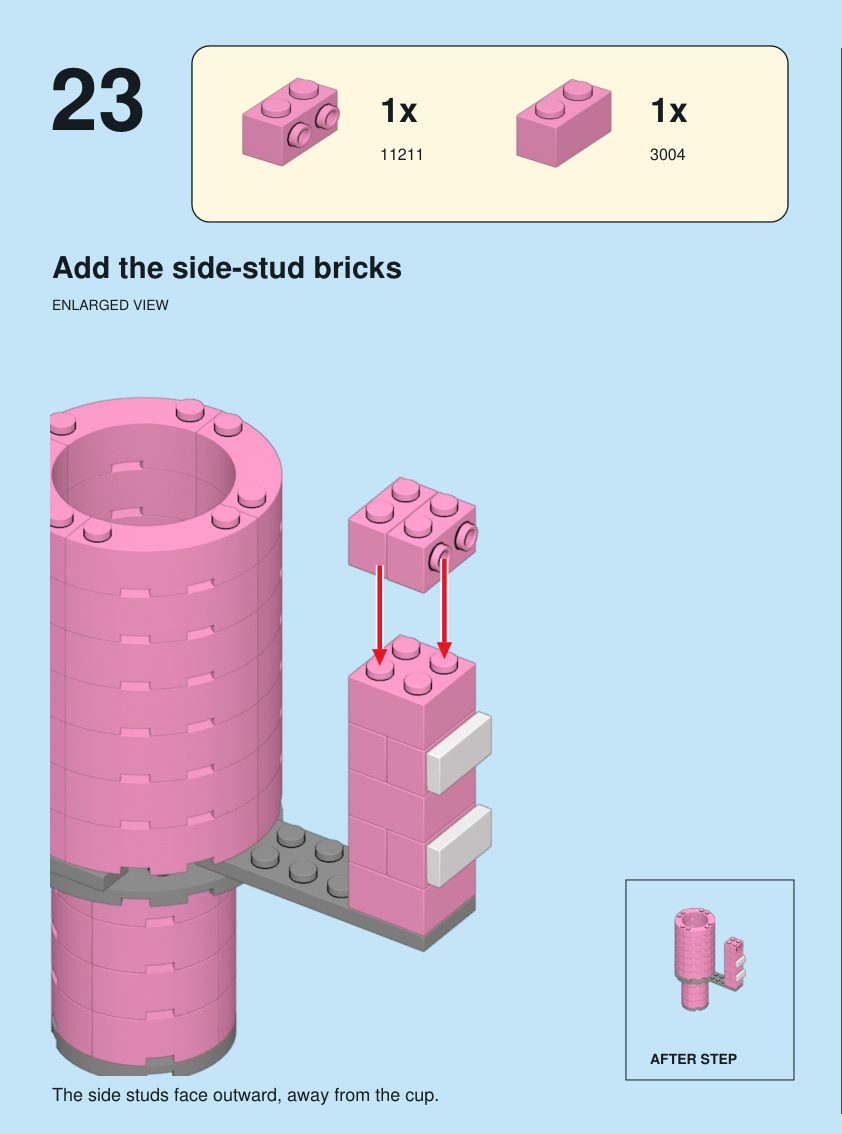
Step 23: Add the side-stud bricks

Step 23. Add the side-stud bricks. The side studs face outward, away from the cup. Pieces: 1 x part 11211, color 29; 1 x part 3004, color 29.

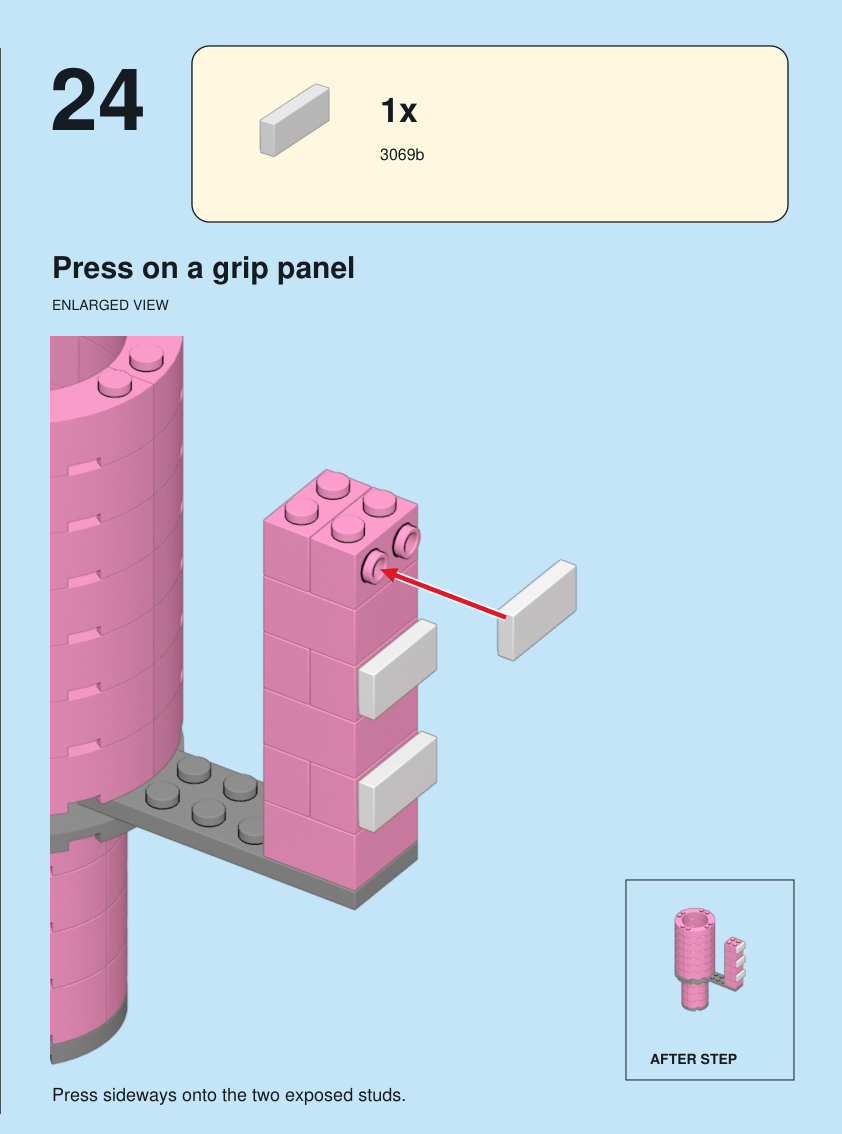
Step 24: Press on a grip panel

Step 24. Press on a grip panel. Press sideways onto the two exposed studs. Pieces: 1 x part 3069b, color 15.

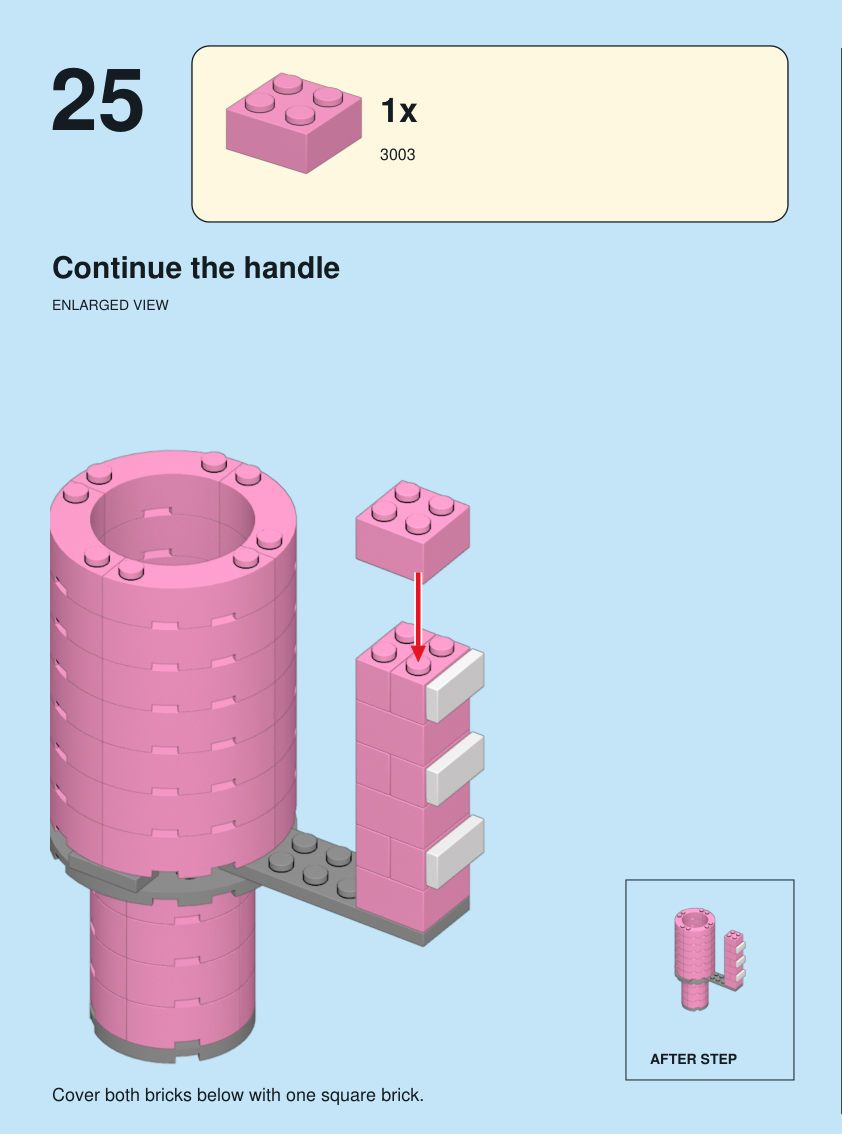
Step 25: Continue the handle

Step 25. Continue the handle. Cover both bricks below with one square brick. Pieces: 1 x part 3003, color 29.

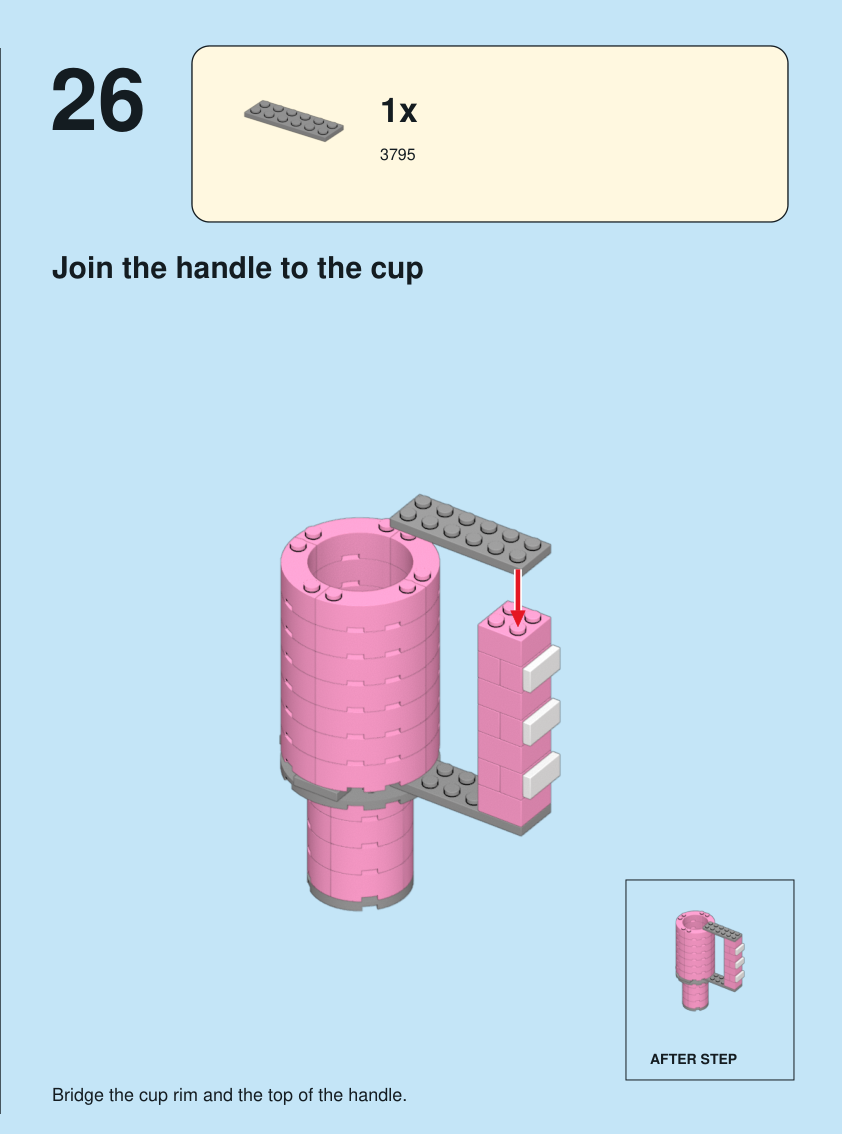
Step 26: Join the handle to the cup

Step 26. Join the handle to the cup. Bridge the cup rim and the top of the handle. Pieces: 1 x part 3795, color 71.

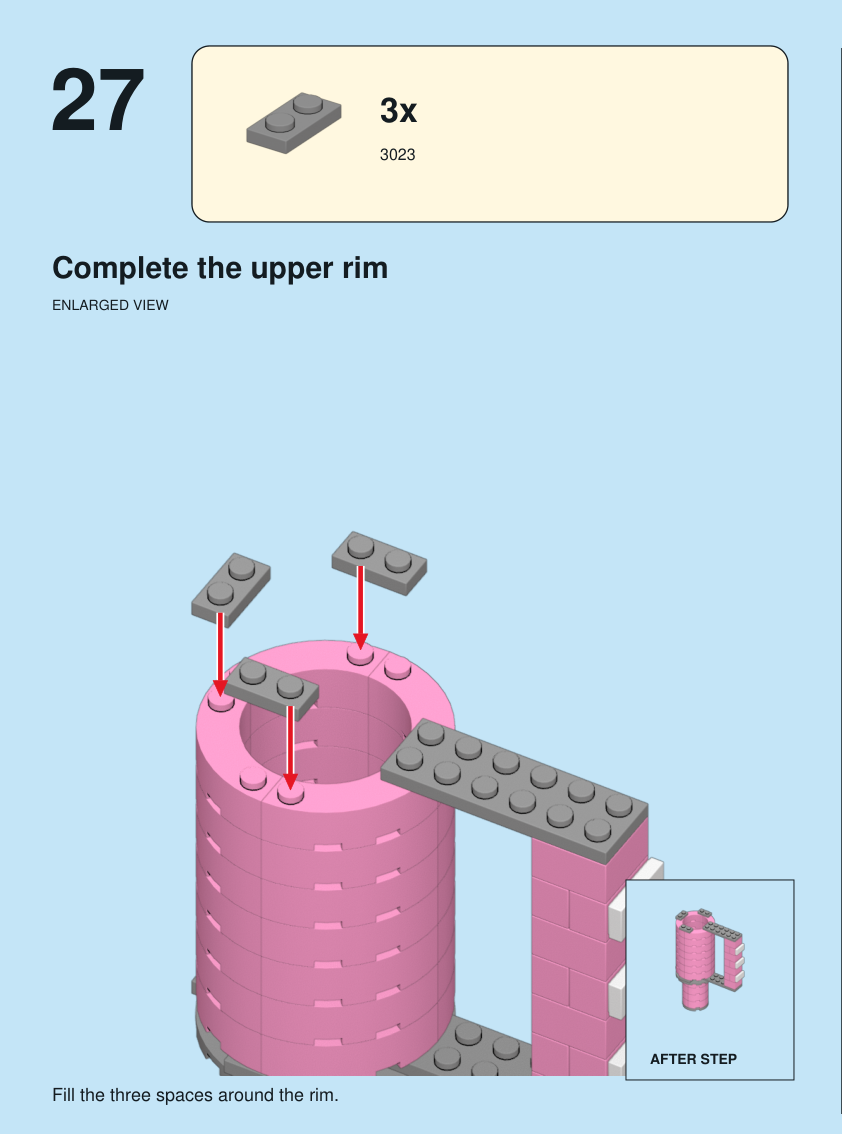
Step 27: Complete the upper rim

Step 27. Complete the upper rim. Fill the three spaces around the rim. Pieces: 3 x part 3023, color 71.

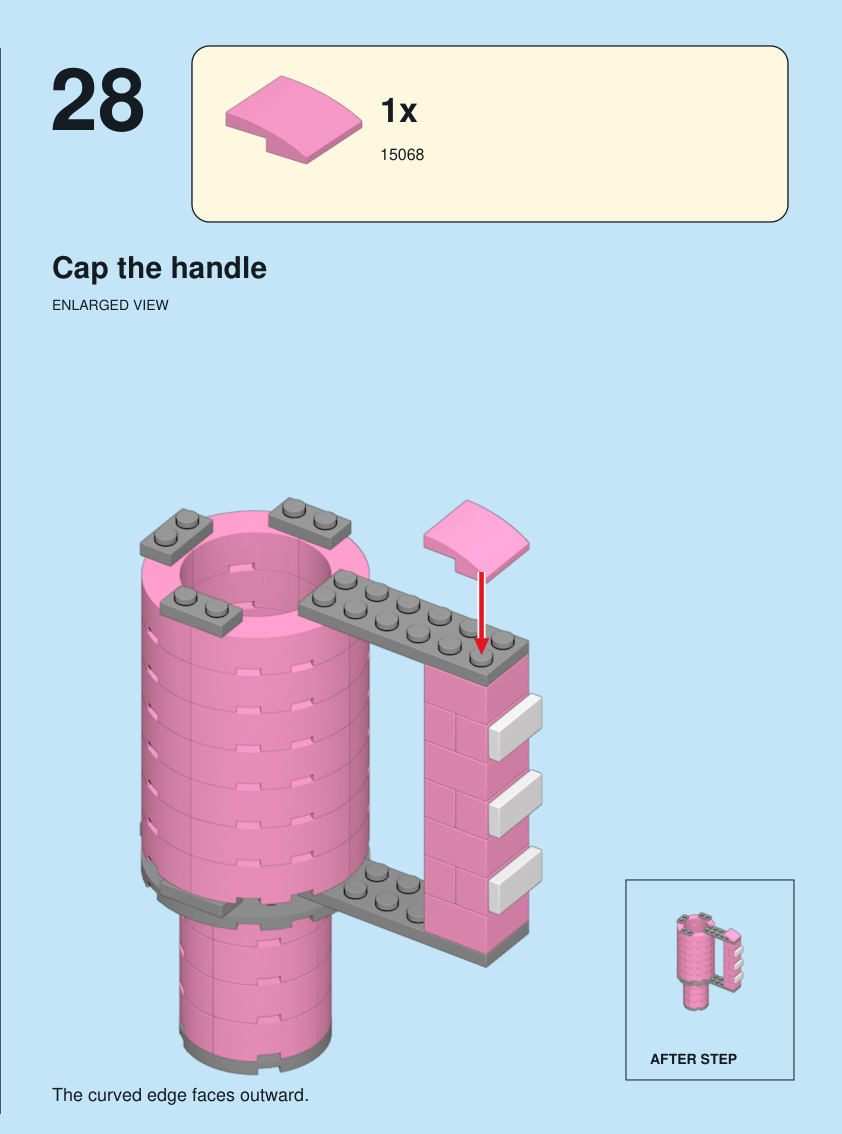
Step 28: Cap the handle

Step 28. Cap the handle. The curved edge faces outward. Pieces: 1 x part 15068, color 29.

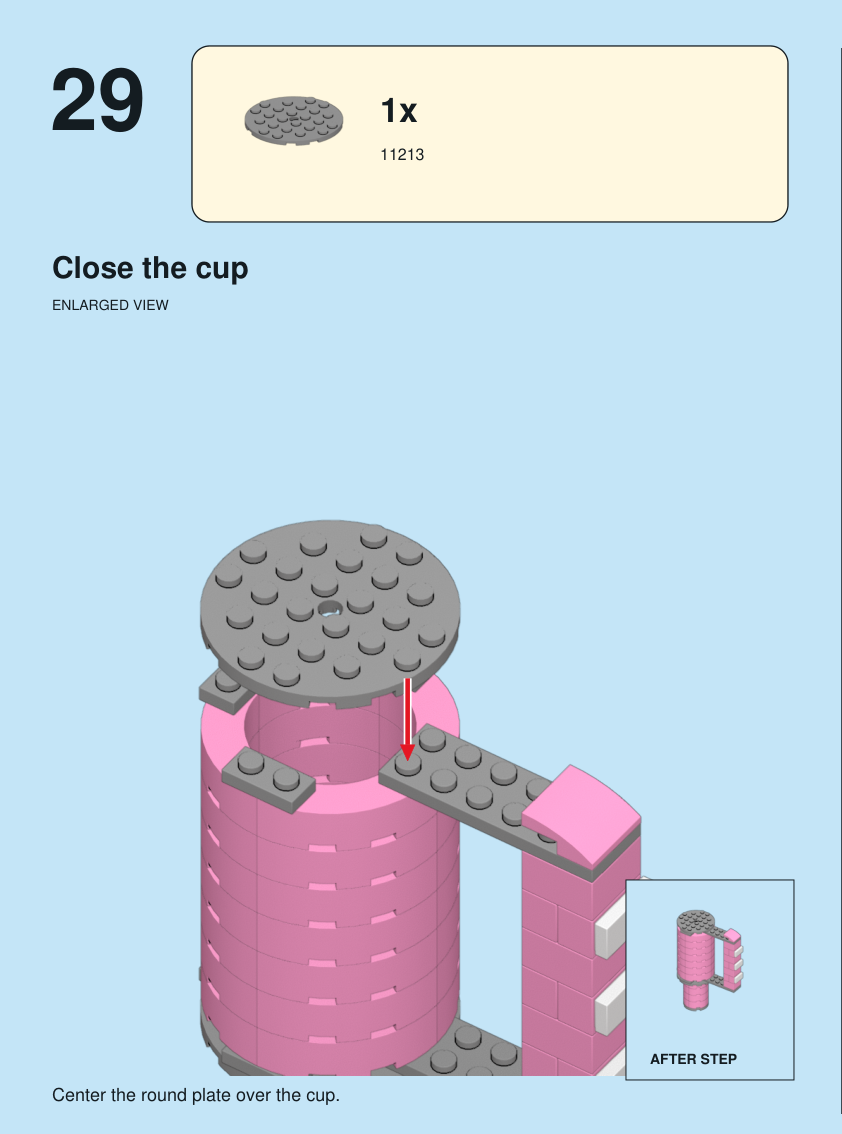
Step 29: Close the cup

Step 29. Close the cup. Center the round plate over the cup. Pieces: 1 x part 11213, color 71.

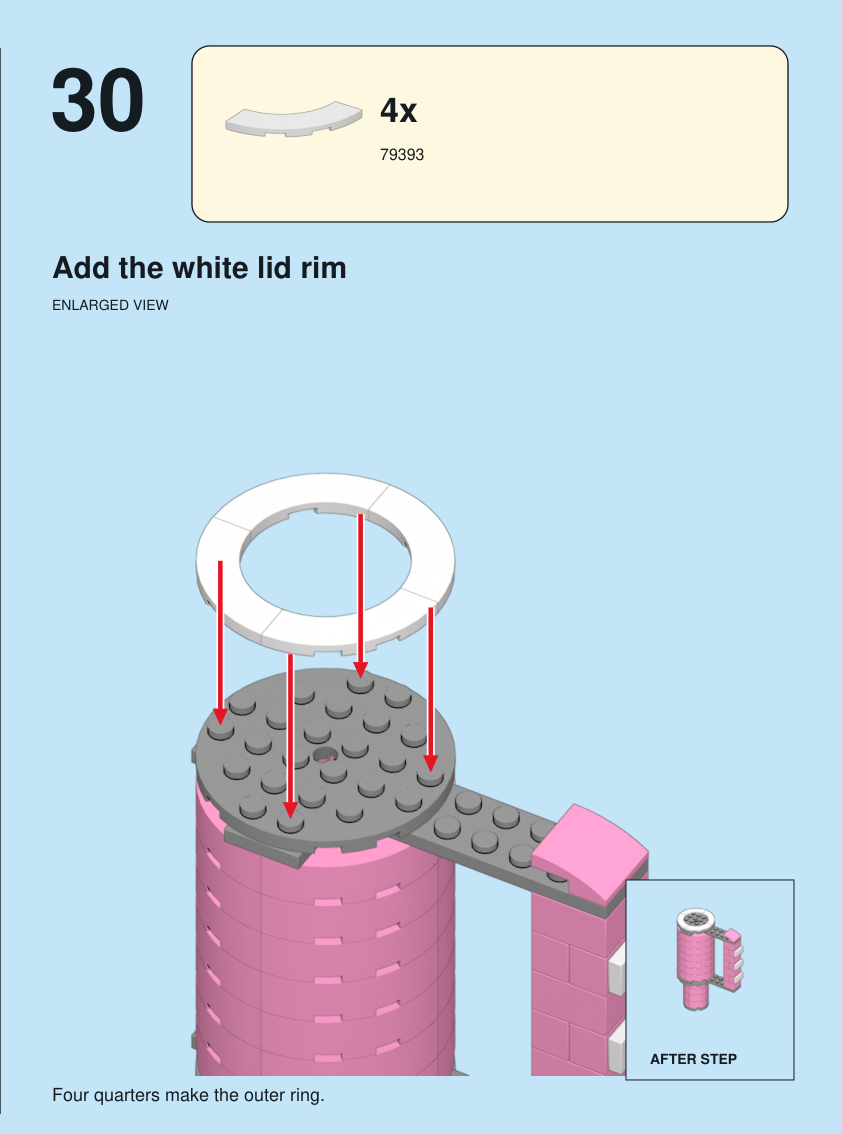
Step 30: Add the white lid rim

Step 30. Add the white lid rim. Four quarters make the outer ring. Pieces: 4 x part 79393, color 15.

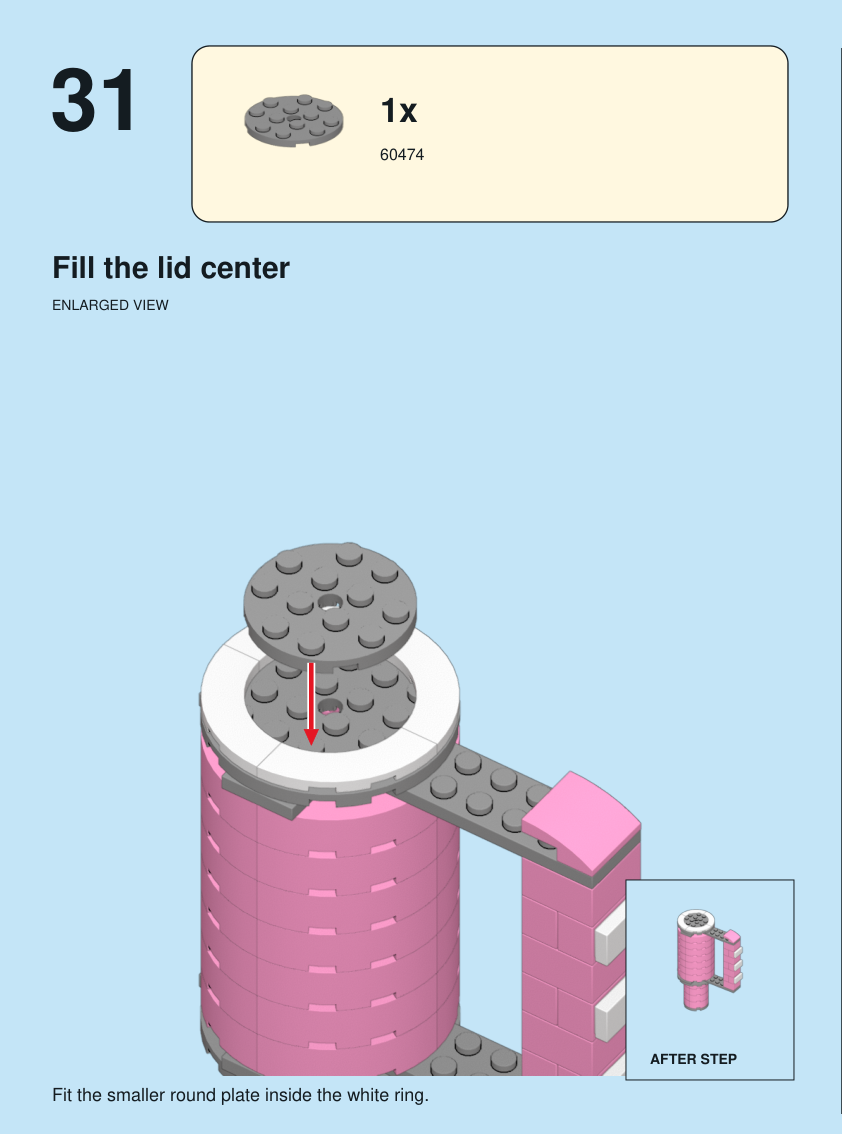
Step 31: Fill the lid center

Step 31. Fill the lid center. Fit the smaller round plate inside the white ring. Pieces: 1 x part 60474, color 71.

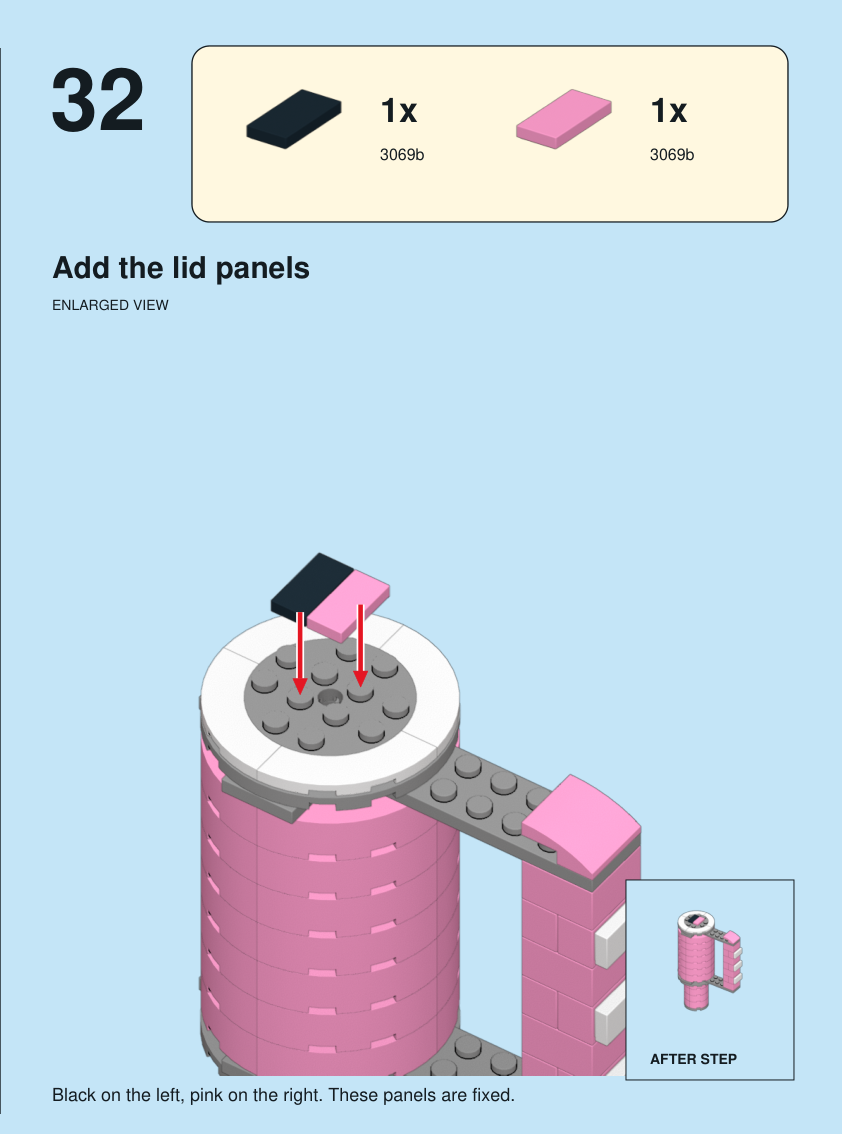
Step 32: Add the lid panels

Step 32. Add the lid panels. Black on the left, pink on the right. These panels are fixed. Pieces: 1 x part 3069b, color 0; 1 x part 3069b, color 29.

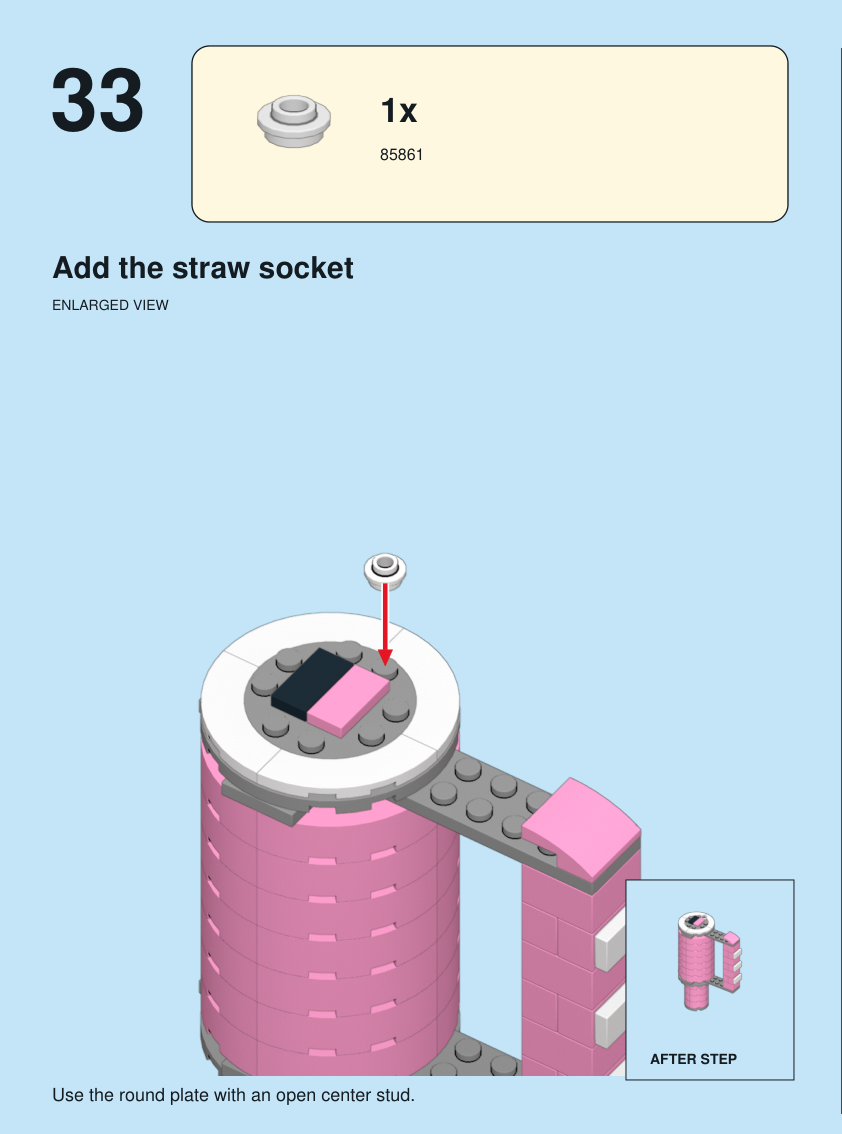
Step 33: Add the straw socket

Step 33. Add the straw socket. Use the round plate with an open center stud. Pieces: 1 x part 85861, color 15.

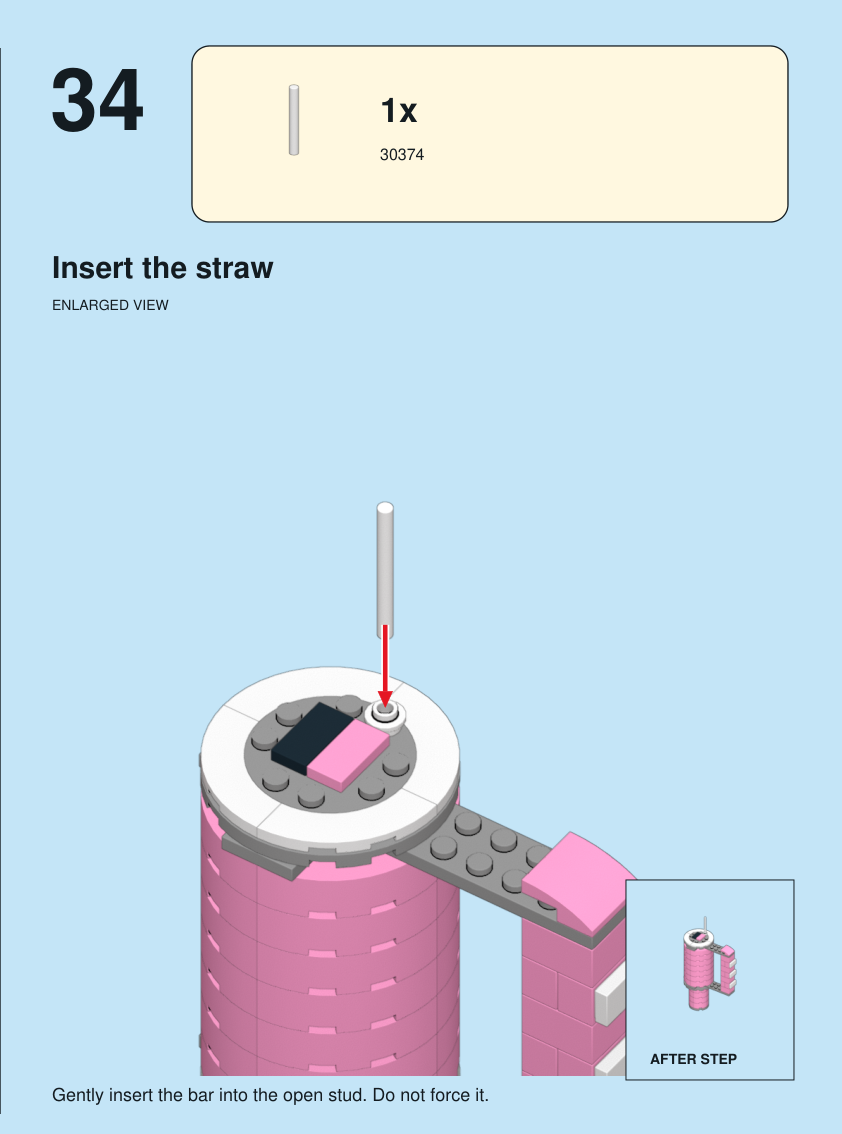
Step 34: Insert the straw

Step 34. Insert the straw. Gently insert the bar into the open stud. Do not force it. Pieces: 1 x part 30374, color 47.

All together.

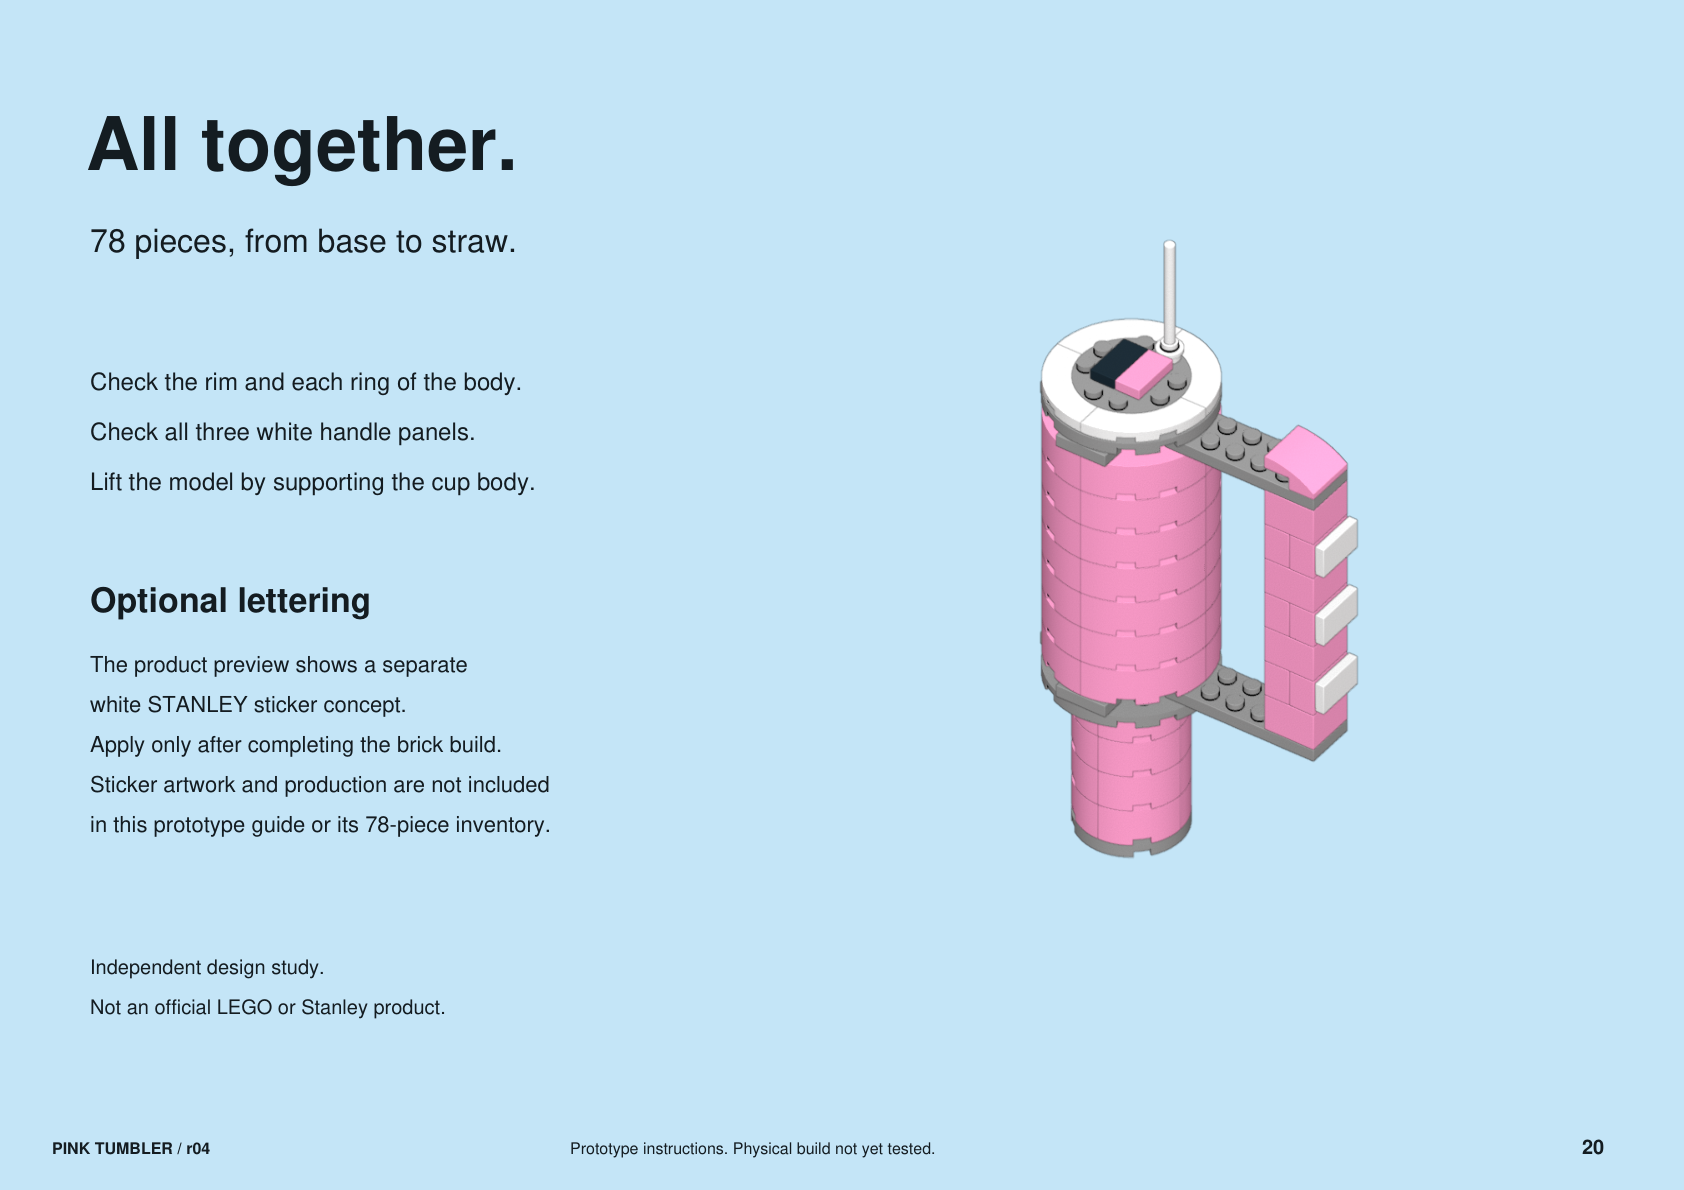
Finished pink tumbler. Check the body, rim and handle. Support the cup when lifting. Pictured optional lettering is not included.

Your little display piece, ready for its spot.

Back to the collection